Design trends in interior decoration dictate the presence of natural textures and materials. Moreover, Chinese consumer goods will not surprise anyone. To make the room look decent and original, you can either go broke on a designer decoration or make it your own. Below we will analyze: how to independently make lamps from wood and what nuances you need to consider.

Advantages and disadvantages of wooden lamps
Like any thing, a wooden lamp has its pros and cons. Advantages of natural interior elements:
- Natural materials are not toxic unlike plastic, synthetic bases. They do not emit a chemical smell and can be installed in nurseries.
- Wood is a malleable material, for its processing you do not need sophisticated equipment, special skills.
- Wooden lamps give the room coziness.
- No need to buy wooden blanks. To find a suitable piece of wood, you can go out of town.
- Wooden lamps are less fragile than glass ones.
But in addition to the pros, there are disadvantages:
- First of all, wood is a combustible material. Therefore, special attention must be paid to the insulation of the wiring, in order to prevent the ignition of wooden lamps.
- Natural materials absorb and evaporate moisture. With a large difference in humidity, the material may deform, crack.
- If handled improperly, mold or fungal deposits may form on the surface.
Features
The main advantages of wooden fixtures are natural material, ease of installation and operation, as well as an aesthetic effect. In addition, such products in the manufacturing process are coated with special solutions that can prevent deformation of the wood structure and the appearance of harmful insects.
Let us consider in more detail the pros and cons of using wood as the main raw material for the manufacture of lamps.
Pros:
- Environmental Safety. The tree does not have synthetic impurities that can be dangerous to human health. During processing with wood there is a minimum of modifications,
- When heated, the tree releases a number of substances useful to the human body. It has a particularly positive effect on patients suffering from chronic respiratory diseases. Therefore, we can safely say that wood has a therapeutic effect, especially when it comes to conifers,
- From wood, you can create a product of any shape. Any design idea will be embodied in the skillful hands of the master,
- A wide range of applications. Lamps made of wood are suitable for use in almost all types of interior. They can have the most diverse forms (round, square, in the form of a bar, etc.) and fit into all styles,
- Aesthetic effect. A lighting device made of wood always looks solidly and elegantly. Wood harmoniously looks in the neighborhood with objects made from other materials, such as plastic, glass or metal. Built-in design elements will not create a feeling of piling up, but rather, they will favorably fasten the entire design structure.

Minuses:
- Low fire safety. The wood ignites easily and the fire begins to spread rapidly. That is why wooden lamps cannot be placed in those rooms where open flame sources are located (fireplaces, gas stoves, etc.),
- Favorable environment for insects. Indeed, wood is a very attractive material for termites and other small pests,
- High sensitivity of the material to sharp temperature drops and jumps in the level of environmental humidity. Therefore, it is highly undesirable to install wooden fixtures in the kitchen or in the bathroom.
The disadvantages of the operation of wooden fixtures can be minimized by using special solutions that protect the structure of wood from deformation.
To avoid the occurrence of various dangerous situations when using wooden lighting fixtures, a number of simple rules must be followed:
- install the appliance at a safe distance from open flames,
- the ideal place in the house for placing a wooden lamp is the room with the optimal level of humidity and temperature,
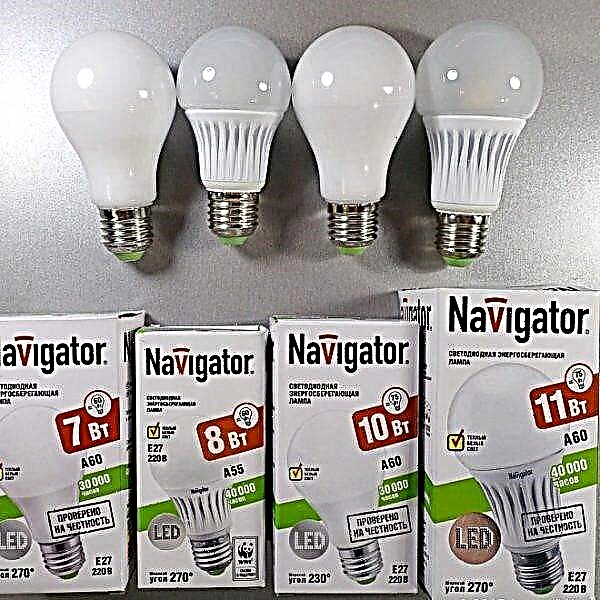
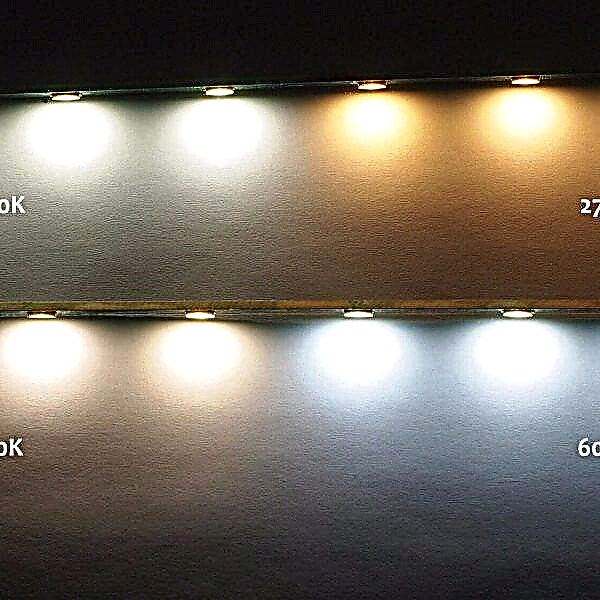
- Do not install incandescent lamps in wooden lighting fixtures - they may become hot to a temperature critical for such lamps, which can cause a fire. For such products, fluorescent, halogen, LED lamps are ideally suited.
Options in the interior
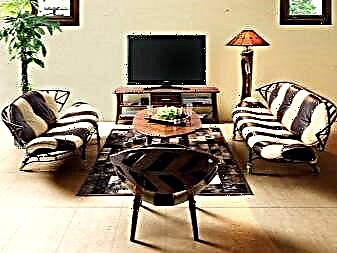
Wooden lamps are not only beautiful, but also very versatile. They are able to enrich almost any design idea, regardless of the stylistic orientation. Most often they are used in interior decoration in oriental style. They also look favorably in a room decorated in the style of "country" - most often these are country houses or cottages. It uses models with a natural shade of wood and a minimum number of additional design elements made of other materials. The combination of noble simplicity and sophisticated sophistication is a valuable property of wooden lamps.
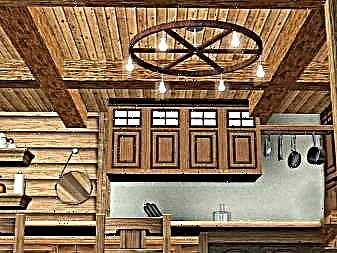
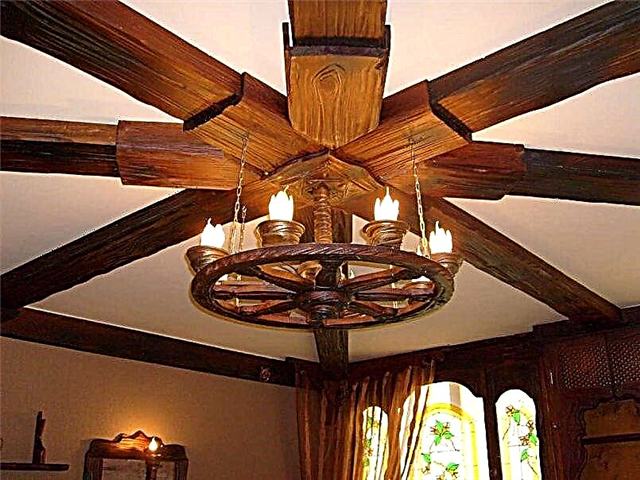
Wooden lighting devices for creating retro interiors are also in demand. With this part you can immerse yourself in almost any era. Recently, lamps made "antique" in the form of a wheel from a cart, on which lamps in the form of candles are placed symmetrically around the circumference, are gaining popularity. Such decor is used for home decoration in the style of the Middle Ages, as well as for stylized public institutions (cafes, bars, restaurants, hotels, etc.).
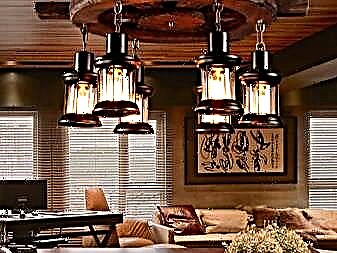
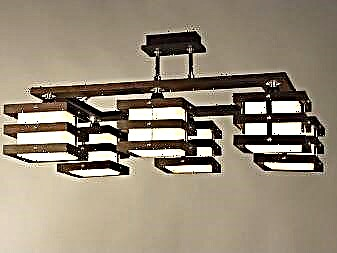
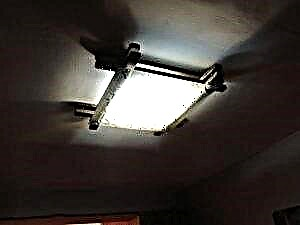
All existing models of wooden fixtures, depending on the type of structure, can be divided into three groups: ceiling, pendant and spot. The most popular outboard models. This is due to the recent growing demand for retro. Ceiling lamps made of wood are good for large rooms or halls, they will bring an element of elaborate elegance into the interior. On the contrary, the point models are ideal for small rooms with low ceilings.
According to the style, wooden lamps can conditionally be divided into several categories:
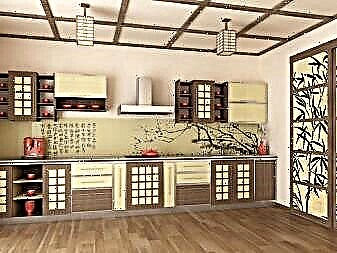
- East style. As the raw material used wood or solid wood without any additional impurities. When constructing a design for such products, the correct geometric shapes and lines are used, as well as motifs characteristic of oriental cultures (Persian, Japanese),
- "Country." Models of wooden lamps made in this style do not have excessive grace and rich decor. Compared to other similar products, they may look too simple and even slightly rude. However, if you correctly fit them into a suitable interior, they will look beneficial and additionally create a feeling of comfort and unity with nature,
- Retro. This can be quite extravagant products, stylized in ancient times, or classic models that duplicate the fashion of the last two centuries,
- Modern. Such lamps are created thanks to the advantageous combination of wood and forged elements (gratings, bulky elements or original patterns),

- Chalet. To create wooden fixtures in this style exclusively natural materials are used. Any element in the interior in the chalet style is designed to emphasize the unity of man and nature,
- Classic style. It uses smooth lines and shapes. Such products are mainly made of wood and stained glass. Also, the design can take the form of a lampshade,
- "High tech". Creative wood lamps made in this style consist not only of wood, but also of metal, frosted glass and other materials that can reproduce the designer’s fantasies,
- African style. Such models are only suitable for creating different ethnic interiors. Inside other styles, they look rude.

How to choose?
If you still decide to purchase any model of wooden lighting, then when buying you should be guided by the following criteria:
- the product should harmoniously complement the interior of the room, where it is supposed to be subsequently installed, and also suit the style. The interior should have several other wooden elements,
- The heating parts of the luminaire, be it cartridges, shades or lamps, must be insulated from the wooden base, which may ignite. It is not recommended to install such a device on a wooden ceiling.
If you are not deprived of imagination and you have time for free creativity, then you can independently create a design project for a wooden lamp, and an experienced wood craftsman will translate your invention into sketches into reality. Of course, the services of such a master will be expensive, but as a result you will get a high-quality handmade product that will meet all your wishes.
If you have experience working with wood, then you can try to do such a thing yourself. There is nothing super complicated. The entire workflow can be divided into several stages:
- Training. At this stage, all the basic elements of the future design are treated with special solutions and impregnations,
- The main stage. The final assembly of the lamp takes place,
- Completion. At this stage, the ready-made lighting fixture is fastened.
First of all, you need to purchase the necessary tools for this type of work, solutions for wood processing, and, of course, the source material itself. All this is on sale. It is important to remember that it is necessary to process the details of the future lamp, otherwise such a product will be very short-lived.
How to make a lamp made of wood with your own hands, see the next video.
Forms
There are many different design options for wooden fixtures. It all depends on the overall style of the interior and the purpose of a particular lighting device. Let's analyze a few of the most popular designs.
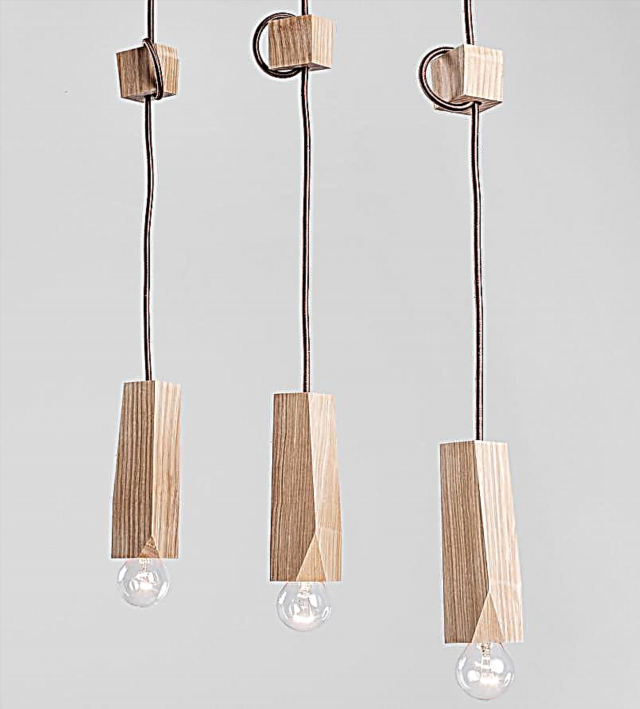
- Wheel. This type of lamps has been in great demand recently among lovers of antique interiors. Suspended to the ceiling with chains or rails, a cart wheel with integrated candles (stylized bulbs) can immerse you in the atmosphere of the Middle Ages. From a practical point of view, such a lamp is convenient in that the lighting from it is distributed evenly around the entire perimeter of the room,
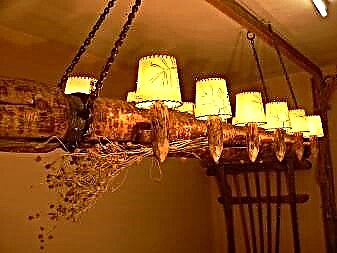
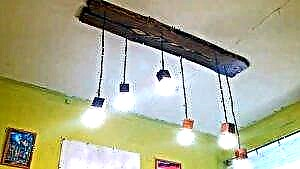
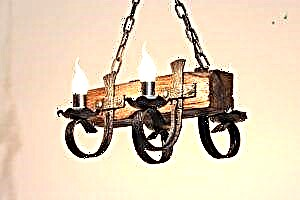
- Solid beam with candles. Everything ingenious is simple! The design of this model is another confirmation of this principle. The lamp is a solid log, fixed with chains. Such products are perfect as a decor in the living room, dining room or bedroom. In the kitchen, such a lamp will look too bulky,

- Pendant lamp made of dry boards and ropes. Here, several matte shades with a very simple design act as light sources. The basic design of the suspension can be supplemented with any decorative elements, depending on the wishes of the author,
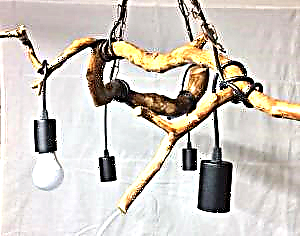
- Model made of wood roots. A rather extravagant version of a wooden lamp. The basic materials for creating such products are dry processed tree roots and ropes. This type of ceiling lighting fixtures looks very profitable with a wooden lining. But there is one caveat - it is necessary to use only energy-saving bulbs, since in such a design the direct light source is very close to the tree itself, which entails a high risk of spontaneous combustion,

- Wooden beam with pots or lamps. This is another original model of ceiling lights. A rather interesting design solution that suits many interior styles,
- A variety of models for children's rooms. Such lamps can be in the form of animals (giraffe, dogs) or any fairy-tale characters.

This is only a small part of all existing ideas of wooden lamps, embodied in life by skilled craftsmen as individual projects or for mass production. And the most important thing is that any of these models can be made copyrighted by making it yourself.
How to choose a tree
To make wooden chandeliers with your own hands, any available species are suitable. Each species has its own characteristics:
- Pine lends itself well to processing, has a striped textured base. Since the resin layer divides the annual circles, it is not used for small parts. Resin prevents decay.
- The cedar has a textured pink base, all the rings in the section are clearly visible. Due to the density of wood, small ornaments can be cut out of cedar.
- Larch is most often used for furniture. They are dense, stronger than pine, not subject to decay. The cut has a brown texture.
- Oak has a high density, but can crack. Therefore, it requires some skill to process it. The most valuable stained oak. It has a darker surface, but is difficult to process.
Regardless of which breed to take, the main thing is that the workpiece is well dried. The material should not have grooves from parasites, traces of decay or mold.
The most durable and outwardly original have root areas. The roots have a uniform texture, with no annual rings and bizarre shapes.
Simple wood chandelier
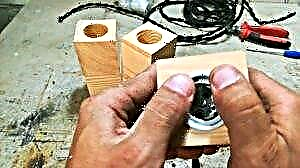
To create a pendant ceiling lamp with your own hands, you can use straight, thick sticks. The main requirement: the diameter should be enough to pull the cord. For a wooden chandelier with our own hands, we need:
- thick sticks
- LED Strip Light,
- water-repellent impregnation.
- drill each stick in the middle,
- cover with impregnation and dry for 24 hours,
- insert the LED strip into the holes,
- connect the contacts of each tape to the cable and isolate,
- Hang with brackets or hook to the ceiling.
Interesting video on the topic:
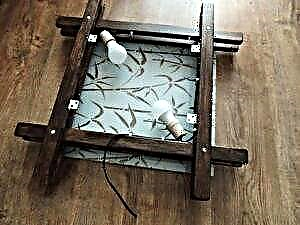
Board lamp
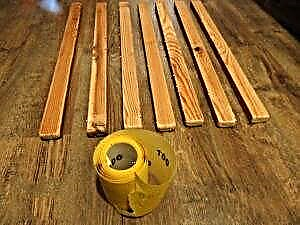
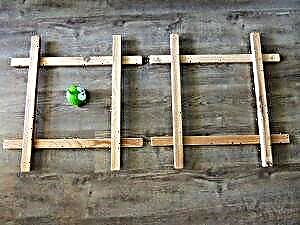
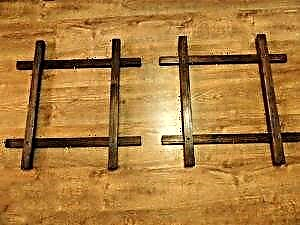
To create a lamp from the boards you will need:
- Four board blanks for forming a rectangular frame,
- Rectangular mirror as a reflector,
- Varnish, glue,
- Drill.
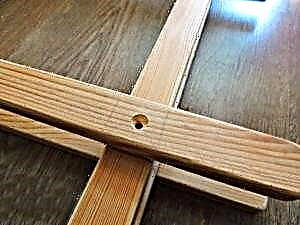
- On the edge of each plank, we make a groove for installing a mirror element.
- From four boards we make a rectangular blank into which we insert a reflector on one side. We fix with glue.
- We make a hole with a drill in one bar, insert a cable with a socle.
- Varnish or stain.
We make a sconce
For a wall lamp with your own hands, it is better to choose geometrically correct shapes in the form of a rectangle or square. To create a wooden sconce, we will come in handy:
- flat rectangular blanks 2 pcs,
- bar for a corner,
- self-tapping screws
- drill,
- varnish, glue gun.
- Workpieces are treated with fungicidal and water-repellent impregnation. After drying for two days, varnish or paint.
- We connect two blanks in the form of the letter "G" with screws.
- Between them we install a corner on the glue to give rigidity.
- We drill a hole for the wire in the upper part and hold the base.
A sconce made of wood is attached to the wall with self-tapping screws or on a bracket.
Recommended video on the topic:
Wooden lampshade
It can be made with your own hands from thin branches. Due to the small diameter, they dry faster. Small branches are more suitable for a ceiling chandelier because they have less weight than a beam or solid. With a combination of subtle elements, the lamp has an airy silhouette that does not burden the interior and makes the light diffused, giving chamberness.
For lampshade come in handy:
- branches
- thick wire
- glue gun
- secateurs.
- We sort out the sticks. Depending on the shape, we select either the same and even, or, conversely, with a large number of bends.
- We treat the branches with an antiseptic. If there is no special impregnation, soak for a day in a solution of potassium permanganate, dry at room temperature for a week.
- From a thick stainless wire we make a frame. The shape can be any: a classic trapezoid, ball, rectangle.
- We attach sticks to the frame with glue. Do not forget to leave a gap for installing the base.
- We cover the wooden lamp with varnish. It will protect against moisture and fungus.
- We insert a cartridge with a lamp, we fix with a wire.

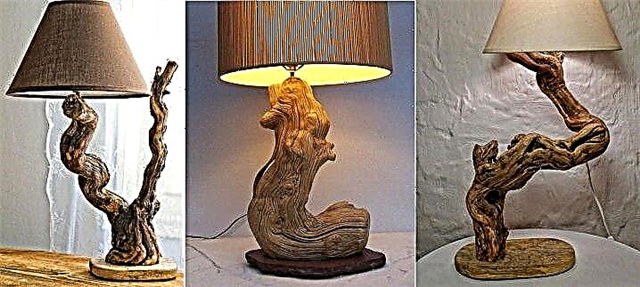
Options of timber and driftwood
You can create wooden chandeliers with your own hands from a thick solid bar. To do this, we need LED lamps that are built into the suspended ceiling. We measure the desired length of the beam. Cover with varnish or stain. We drill round holes for the diameter of the lamps in the beam. We install emitters on heat-resistant glue.
To fix the lamp from the beam to the ceiling, you will need several consoles. If you make a stable stand, the lamp turns into a floor version.
What you need to make a wooden chandelier with your own hands
First, you need to fully think through the design of the future wooden chandelier. It is important that it harmoniously fits into the overall interior of the room. For apartments with high ceilings, massive and complex designs with additional decor are suitable. In small rooms, a large chandelier will visually hide the space and attract too much attention. For low ceilings and small rooms, more concise models are needed.
A major role is played by color. Wood should be combined in shade with the main furniture (cabinets, dining table) or with one of the walls in the room. To do this, you need a special varnish-paint, which will help to adjust the color of natural wood. In addition, wooden parts must be protected from temperature extremes, dust and other adverse factors, so it is important to purchase high-quality varnish.
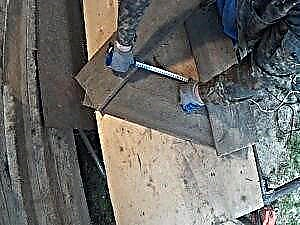
To assemble a wooden chandelier with your own hands, you need at least minimal wood working skills. You need to know how to properly saw wood, grind and connect parts to each other.
What tools may be needed when working on a wooden chandelier:
- drill,
- screwdriver
- screwdrivers
- long and short ruler,
- manual or electric jigsaw,
- hacksaw,
- markers and pencils for marking,
- sandpaper or sanding machine.
It is still necessary to purchase wires, lamp bases, lamps themselves and special mounts. For the decor of a homemade chandelier, metal shades, chains, glass may be required. Wood is not compatible with porcelain and thin plastic.
Drawings of wood chandeliers
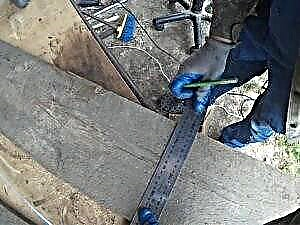
The first step in the process of making a wooden chandelier with your own hands should be a drawing. This step will help to build the desired model correctly. It is necessary to calculate all sizes, consider the placement of lamps and fastenings to the ceiling. Below are some ready-made drawings, according to which you can assemble an original lighting device.
A simple model, consisting of 1 wooden board and three shades, chain hooks are fixed on the back at an equal distance
Chandelier from 3 boards, all elements are interconnected with small nails and a rope
At first glance, the design of a wooden lampshade is complicated in the form of a box, but the details for manufacturing are very simple
Below are drawings of plywood chandeliers. All details can be printed on thick paper and transferred to the material, then cut them out with a jigsaw. Sizes can be any. The structures are assembled without glue and screws, the elements are simply inserted into the grooves.
A cylindrical chandelier is good in that it is possible to place light-scattering material inside (frosted film, plexiglass)
A lampshade resembling a Chinese lantern is a good option for a high-tech interior
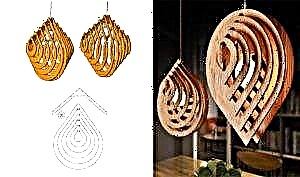 Unusual, but at the same time very simple teardrop shape suitable for the style of "minimalism"
How to make a wooden chandelier with your own hands
You can independently create various models of wooden chandeliers. As materials, branches, boards, thin slats and plywood are suitable. To strengthen and decorate some lighting fixtures, metal parts will be required. They can be purchased at hardware stores. Below are detailed descriptions of popular chandeliers suitable for different interior styles.
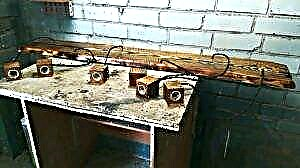
Simple homemade wooden chandelier
This model is suitable for high ceilings and spacious rooms. It can be placed above the kitchen worktop in the studio apartment or above the bar in the cafe.
 Easy-to-execute option - chandelier made from trimmed boards
To work, you will need:
- thick and wide pine boards,
- a bar with a section of 7 × 7 cm,
- 6 rounds and bulbs,
- 2.5 m of fabric braided wire,
- clear varnish for coating,
- hacksaw,
- screwdriver
- Forstner drill
- sandpaper,
- plane,
- grinder with a cleaning disk,
- gas-burner.
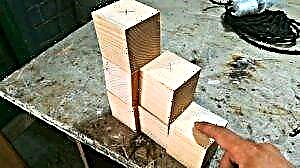
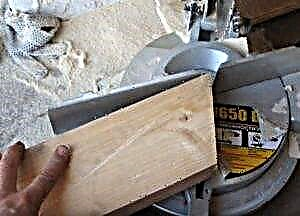
- Cut the bar with a planer to make its surface smooth. Saw with a hacksaw into the same cubes, which must be sanded with sandpaper, removing all bumps and burrs. On one side, find the middle and put a mark.
- Forstner drill, the diameter of which should correspond to the size of the cartridge, make holes, focusing on the set marks.

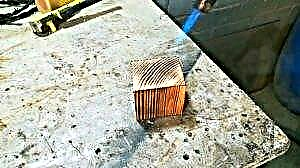
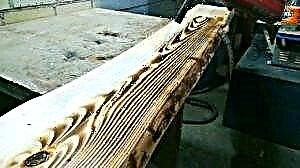
- Gently burn each cube with a gas burner so that the veins of the tree change color.
- Insert cartridges into the holes, after connecting them to the wire. The length of the cords should vary so that in the end the lamps hang at different heights.
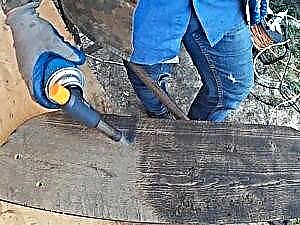
- Now you need to process the surface of the board. If it is too uneven, then you should walk along it with a plane. Using a grinder, process the edges, giving them a smooth, rounded shape.
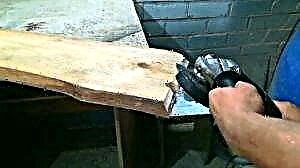
- Sand small burrs and irregularities with sandpaper. Then take the burner and burn the surface of the board from the front side.
- Apply varnish to all parts, allow it to dry. Drill holes for each wire in the board.
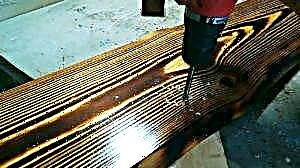
- All wires with cubes and cartridges need to be installed in their places.


DIY antique wood chandelier
To enhance the effect of the old wood, the boards are covered with darker varnish. Plafonds are painted black, and a decorative layer of gold paint is applied on top, which will imitate cracks and abrasions.
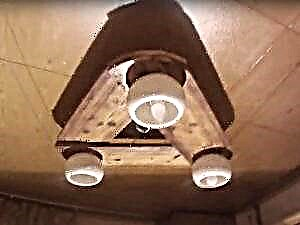 This model of chandelier is suitable for small rooms and will complement the interior in the style of "country"
- pine board from 3 cm thick,
- 3 lamps and 3 shades,
- wires
- wood varnish,
- 5 m chain with middle links,
- hooks for fastening,
- sandpaper,
- electric jigsaw
- plane,
- roulette,
- hacksaw,
- long ruler
- gas-burner.
Step-by-step manufacturing process:
- A ruler and a pencil need to make marks. On these lines, saw the board with a hacksaw into 3 equal parts.
- Fold the resulting details in the form of a triangle, as shown in the photo. The sides of the inner hole should be the same.
- Cut boards with a planer and sandpaper to remove large irregularities. Temporarily connect the parts to each other with self-tapping screws. Now you need a round object that you need to attach to each corner and circle with a pencil so as to get smooth edges.
- Saw off the excess with a jigsaw according to the marking.

- Unscrew the screws and burn each board with a gas burner.
- Fasten all parts together and varnish in several layers. Leave to dry completely.
- Drill to make holes for the wires and install shades with lamps.


It remains to screw 3 hooks on the back side and thread a double chain through them. Now you can hang the product under the ceiling and connect.
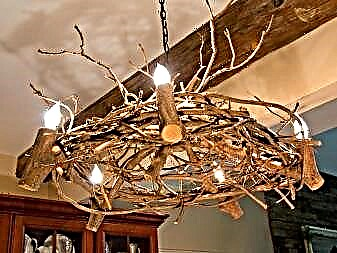
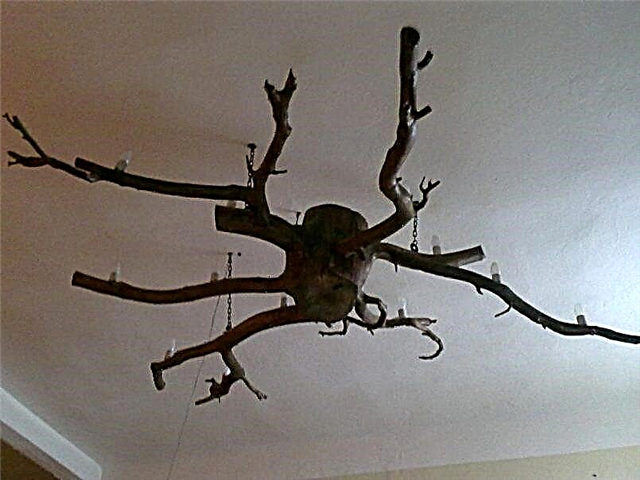
DIY chandelier made of tree branches
Such lamps look good in wooden houses, where the color of wood is the main part of the interior. Making this model of a chandelier with your own hands is very simple.
 One of the easiest and most original ways to decorate the ceiling is a chandelier made from dry branches.
- a thick branch of an unusual shape,
- sandpaper,
- hand jigsaw
- wood varnish,
- 4 rounds and 4 lamps,
- wires
- chain and hooks for fastening.
A manual jigsaw needs to cut off all the thin edges of the branches. With sandpaper, remove the bark and coat the snag with varnish. Screw in the hooks and secure the chain. Wind wires with lamps so that the cartridges are at approximately equal height. Hang the lamp in place.
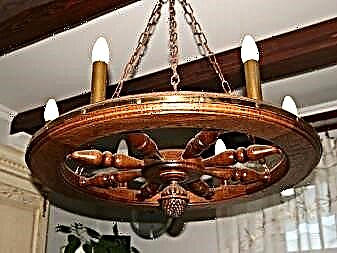
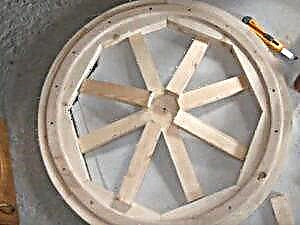
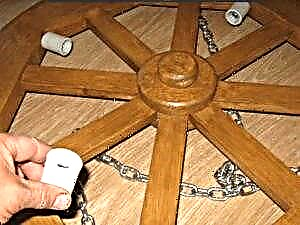
DIY wooden chandelier wheel
Wheel chandeliers were popular with the British in the 40s. Therefore, you can call this model "retro".
 The lamp in the form of a wheel is more difficult in execution than previous models
What tools and materials are needed:
- 9 pine boards 20 cm wide, 5-7 cm thick,
- 8 rails 3-5 cm thick,
- plywood sheet
- aluminum sheet
- 2 m chain, 4 hooks,
- short screws
- decorative nails
- Sander,
- sandpaper,
- hammer,
- screwdriver
- electric jigsaw
- drill,
- 2 crowns for wood of different diameters,
- scissors for metal,
- wood glue,
- wood varnish,
- wires
- 4 socles and lamps,
- hacksaw or electric saw.
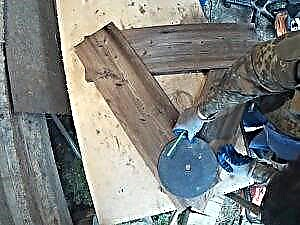
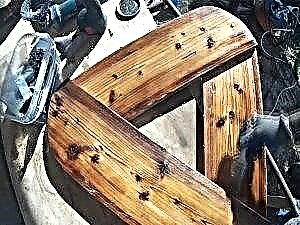
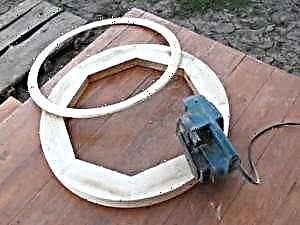
- The wheel is assembled from 8 boards. The edge of each of them needs to be cut at an angle, as shown in the photo.
- All ends are smeared with glue and connected to each other to get an octagonal figure. When the glue dries, in order to strengthen the structure, it is necessary to screw in short self-tapping screws at an angle, greatly deepening the caps.
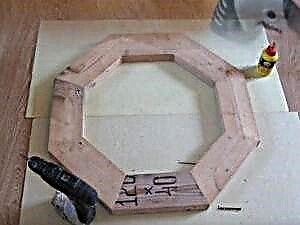
- Now you need to cut the corners and make the wheel round.

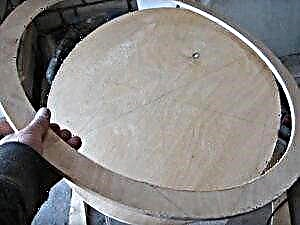
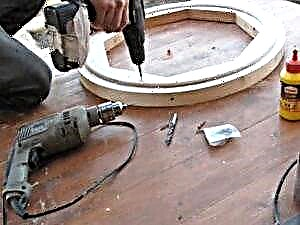
- On the plywood sheet, 2 circles are plotted slightly less than the diameter of the chandelier. It is necessary to place them so that a ring is obtained, that is, 1 circle will be 2-3 cm larger than the other. The ring is cut out with a jigsaw.
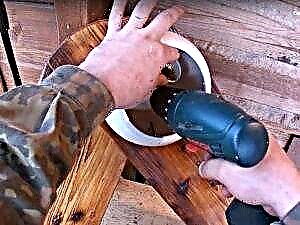
- All details are polished with a machine.
- The ring is coated with glue and placed on top of the wheel. For reliability, short screws are screwed in 3-4 places.
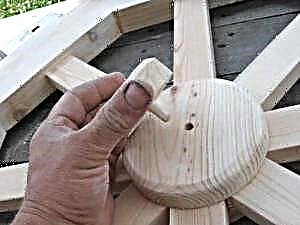
- 2 circles are cut from the last pine board using a special crown.
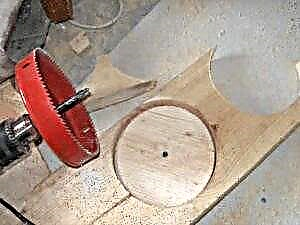
- Grind the circles and 1 of them is placed in the center of the wheel.
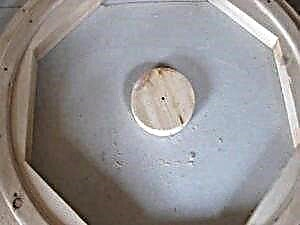
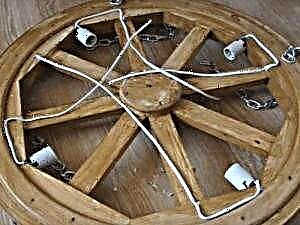
- Now you need to measure the distance between the inner edges of the wheel and the circle and, in accordance with the result, saw 8 rails. Grind and fix each of them, lubricating the ends with glue and screwing long screws on the sides of the chandelier. Then connect the rails with a circle with short screws.
- Close the junction of the rails with the middle in a second circle. Using a smaller diameter crown, cut another 1 circle and sand it with sandpaper. Turn the wheel down with the plywood ring. In the middle of the small and large circle, make holes and plan a chop. Glue to fix it inside the small circle and insert it into the big one, after having greased the tip with glue.
- The product is varnished on all sides.
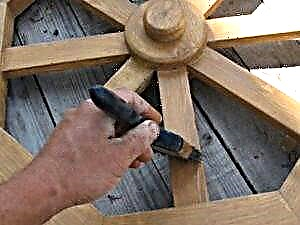
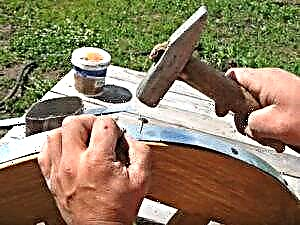
- From metal, cut a strip equal in length to the diameter of the wheel with scissors. Using a hammer and decorative nails, fix the aluminum strip in a circle, as shown in the photo.
- Install lamp holders between the rails and connect the wires.


 Screw the hooks to the plywood ring and extend the chain. It remains only to insert the lamps and connect the chandelier to the wiring
To cut corners, you need to draw an exact layout in a circle. The figure is placed on a wooden table or on the floor. Drive a nail in the center. A thread and a pencil are tied to it at the distance where the line should go. Pulling the thread, pencil draw an even circle.
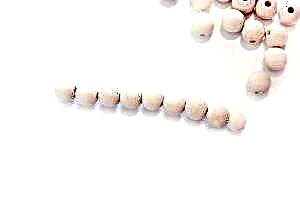
DIY wooden bead chandelier
A homemade wooden bead chandelier is a versatile model. So that it harmonizes with the interior, it is enough to choose the right color for the material.
The lamp and cartridge are mounted separately on the ceiling, you need to leave 25-30 cm of the cord so that the base hangs
- a basket of wire or flower pots,
- wooden beads 700 pcs. large, 130 pcs. medium in size
- strong cotton thread
- decorative cord
- scissors.
How to assemble such a chandelier:
- Cut 40 cm of thread and string 1 smaller bead, placing it in the middle. Fold the thread in half and string another 8 beads, but larger.
- Tie strands with beads to the frame, starting from the bottom.
- Use a decorative cord to secure the chandelier to the ceiling.

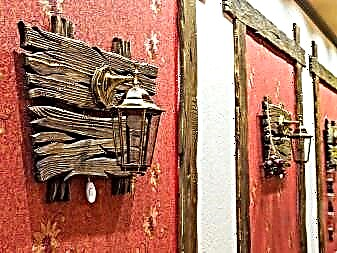
DIY metal and wood chandelier
Another simple wooden chandelier that is easy to make with your own hands.
Cartridge metal elements can be purchased at hardware stores. Most often, such parts are used for wall lights.
The photo below captures a very simple option: a wooden block was cut and burned with a burner, then varnished. Ready-made lamp holders were screwed on the sides. 2 hooks were fastened from above and extended a chain. For the effect of "antique" purchased and screwed lamps in the form of a flame.
 To make a chandelier, you only need to show imagination
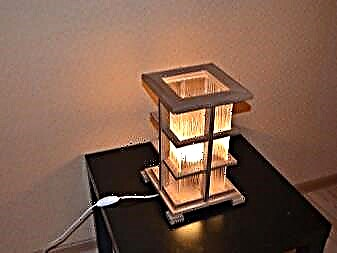
DIY wooden chandelier
What you need to work:
- saw,
- drill,
- sandpaper,
- 6 mm glass drill bit
- wood glue,
- 8 pcs slats 20 * 40 mm,
- 4 bolts with a diameter of 6 mm, length 10 cm,
- 4 cap nuts and 4 ordinary
- window glass 48 × 48 cm,
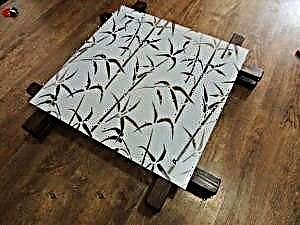
- transparent self-adhesive wallpaper with a pattern,
- two cartridges with mounts,
- wires
- connection terminals
- 4 corners 3 × 3 cm.
- All slats need to be cut so that they are the same length. Sand and round the edges with sandpaper.
- Using glue, assemble 2 identical frames, as shown in the photo. Each edge protrudes 10 cm.
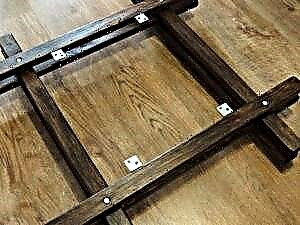
- Put the frames on top of each other and drill holes for the bolts.
- Then varnish each frame.
- When the coating dries, assemble the structure. Secure the bolts with the nuts on the back.
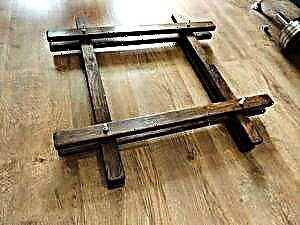
- On two sides from each edge, retreat 5 cm and tighten the corners. They are needed to mount the chandelier to the ceiling.
- Glass cut a square from the window glass 48 × 48 cm.
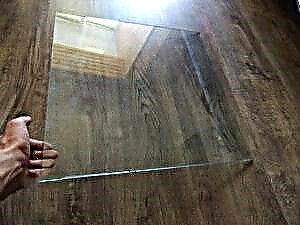
- Place the glass on top of the wooden frame on the side where the bolts are. Mark the places for holes with a marker and drill them with a special pen drill. Then, glue a decorative film on the front side of the glass, then put it on the protruding bolts and fasten with cap nuts.
- In the assurance, screw 2 lamps with cartridges in the corners and connect the wires.
- To hang the chandelier to the ceiling, you need to remove the glass. When the screws are screwed in, return the glass.


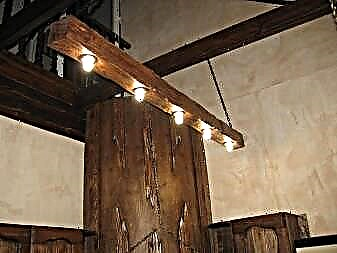
DIY wooden loft chandelier
To assemble such a model is not difficult. It will be necessary to saw a wooden beam 15 × 15 into 4 identical parts. Chisel to remove part of the wood from the lower edges. Lightly sand the resulting potholes and burn with a burner. Coat the bars with varnish.
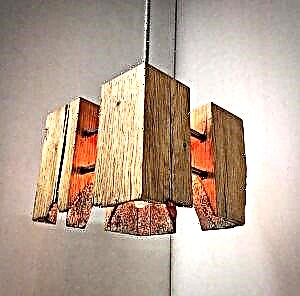 The loft style is rude and courageous, so a wooden chandelier must meet these standards.
On the side, make 2 holes at the same distance and connect the wooden bars of honey with scraps of a metal pipe. From above, obliquely screw a piece of plywood treated with varnish, with a hole in the middle through which a lamp holder and a thick wire in a fabric braid will be threaded.
DIY wooden chandelier
First, wooden boards are trimmed, well sanded and varnished. At the bottom, using a chisel and a hammer or on a machine, make a 2-3 cm deepening. From the edge, a through hole is drilled across the board and soldered wires are brought up. The tape is glued into the recess and covered with frosted glass, which scatters the light well.
 To assemble a similar chandelier from wood, you need soldering skills, long wires are soldered to LED strips and a special unit that will regulate the voltage
How to make another model of a LED chandelier made of wood with your own hands, you can watch in this video:
Photo of wood chandeliers
In the photos below, you can see some more models of chandeliers and lamps made of wood, which you can do yourself.
 A simple and concise chandelier made of a wooden bar is perfect as a decor in a cafe or for home cooking
 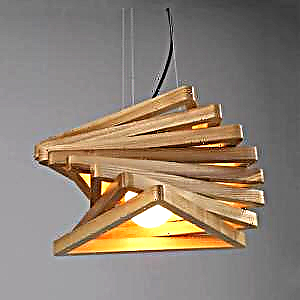 Chandelier of unusual shape, assembled from wooden battens, it will fit into the interior in the style of "high-tech" or "minimalism"
A lamp made of wood and rope will create a cozy and warm atmosphere. The cord is hidden inside a thick rope. It is important that the lamps do not heat up too much.
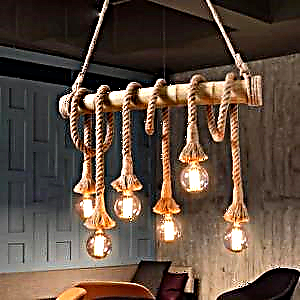 Before assembly, the future chandelier rope should be treated in a special liquid.
 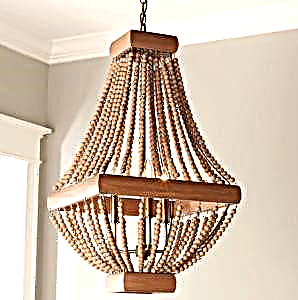 The original chandelier made of wooden beads will look good in a classic interior and in the baroque style
 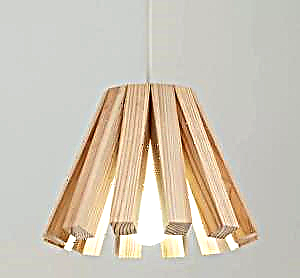 A common option - a chandelier made of wooden battens in the style of "minimalism"
  A sophisticated model of a wooden chandelier made of plywood is suitable for a bedroom
  To work on this chandelier, wooden snags of an unusual shape were selected, they resemble moose horns
  You don’t have to figure out how to screw the base and hide the wires inside the wooden structure, you can take an ordinary lamp and complement its design with a small element of wood
Advantages and disadvantages
Lamps made of wood in the interior of the room play a special role. Thanks to their undoubted advantages, they add a unique twist, which can become the hallmark of any room.
At first glance, it may seem that there are not so many pluses, but each of them makes a huge contribution to the beauty possessed by products of a similar nature.
Pros:
- High strength characteristics (which means the product will last longer)
- Wood is an environmentally friendly product, it does not contain harmful elements,
- Beautiful appearance,
- A large selection of models (ranging from size to wood type),
- Easy installation
- Universalism, which allows you to combine this piece of decor with any modern style,
- Wood goes well with other materials (metal, ceramics, textiles).
In addition to the advantages, there are, of course, disadvantages (but the benefit is not so much):
- Wood materials are subject to burning,
- The influence of ambient humidity
- The probability of damage to the structure of small insects.
Nowadays, things made by hand are very much appreciated. Such unique decorative works are not in vain considered to be works of art.
Masters of their craft do such things for which the question “how to make a lamp from wood” is not even worth it. They can create what the buyer himself wants, taking into account all the smallest details up to the color and size of the product.
Such projects are individual in nature and will require a person to be satisfied with a large amount of financial resources.
As a rule, such orders are not limited to hanging wooden chandeliers. They include the whole range of original lighting devices that will be installed in a particular room.
This can be, for example, lamps for the floor, wall lights, sconces for the street, which can create lighting effects, etc.
But, despite the various functions, each of these objects is united by a common decorative style.

Quite interesting options are such ideas as:
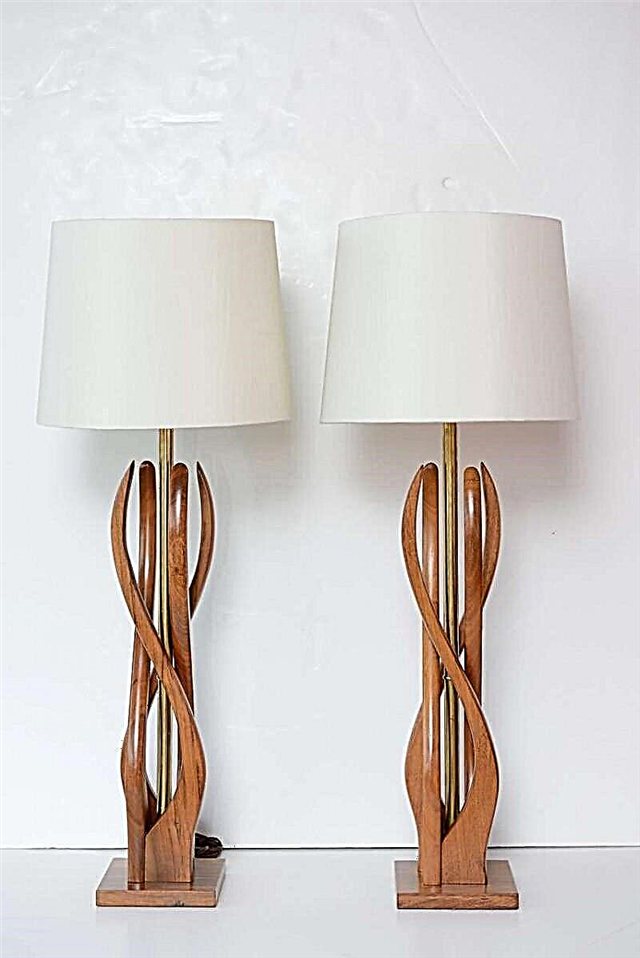
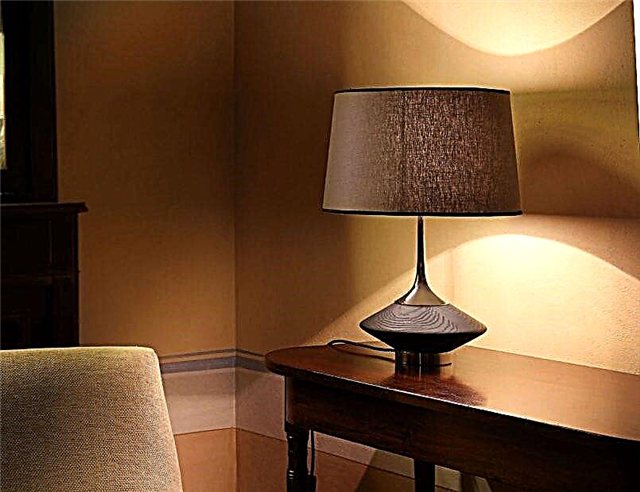
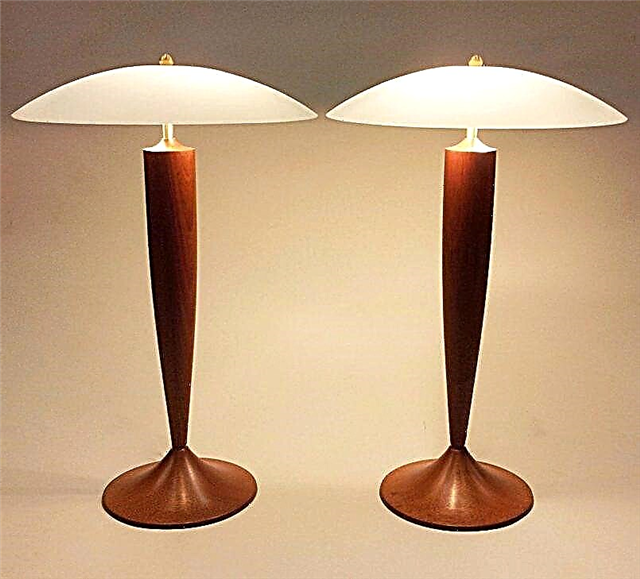
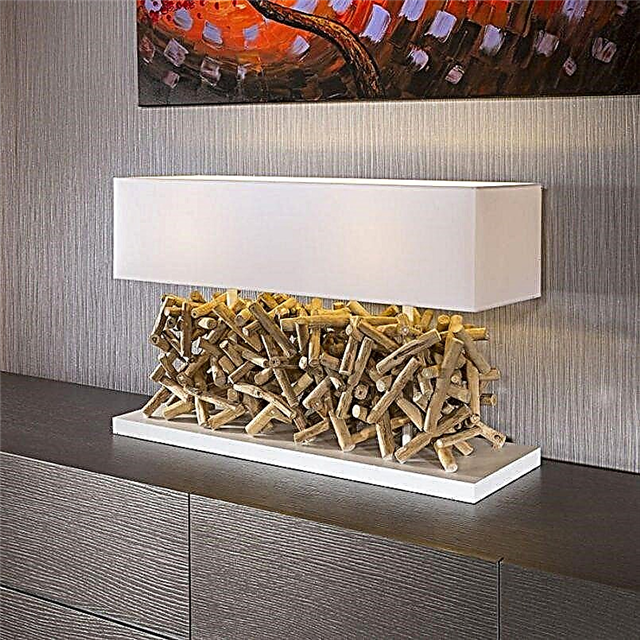
- Table lamp with stand in the form of a wooden stump,
- Stylish round chandelier,
- Cone-shaped chandeliers with wood inlays,
- Table lamp in the shape of a man, etc.
The best choice for installing such a product is a living room or bedroom. It is there that they will demonstrate all their decorative advantages.
Purchasing and checking important parts
Having seen enough in the global web of photos of lamps made of wood or wooden chandeliers, a person can immediately run to the nearest store and buy a model they like.
Of course, this is the right of anyone, but before the final purchase you need to make sure that all the components are made of quality material. It concerns:
- A decorative component (each model has its own forging, there may be a wooden hoop, other carved decorations, etc.),
- Diffusers (this includes shades, lampshades),
- Type of attachment (such items can be attached using a metal hook, a strong plastic strap).

Styles
Due to its versatility, wooden lighting elements fit any style. But most often it is:
- Country
- Eco,
- Provence
- East direction
- Classic,
- Modern.
Also very often you can find styles of romanticism or the era of the Middle Ages.
In such styles, wooden flat-shaped chandeliers, table lamps with a fabric lampshade, stylish sconces made of wood and metal, or lamps that imitate candles look very nice.