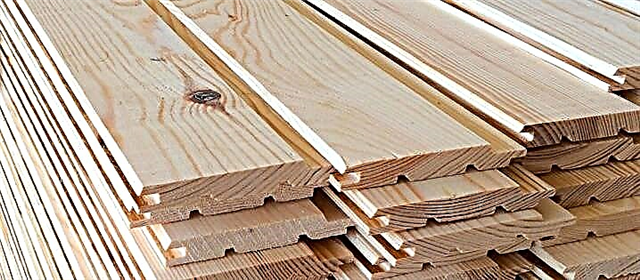
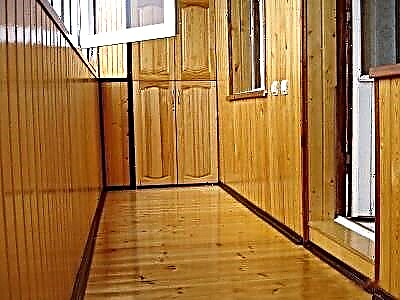
Basically, when they talk about lining, they mean wood products. Much less often, PVC panels are also called this term, adding the word “plastic”. Probably, the whole point is in a very similar principle of connecting the strips to each other and the method of their installation, as well as in the fact that it looks like long boards with a spike on one side and a groove on the other. Choosing which lining to use for a balcony, usually proceed from cost, esthetic or practical considerations.
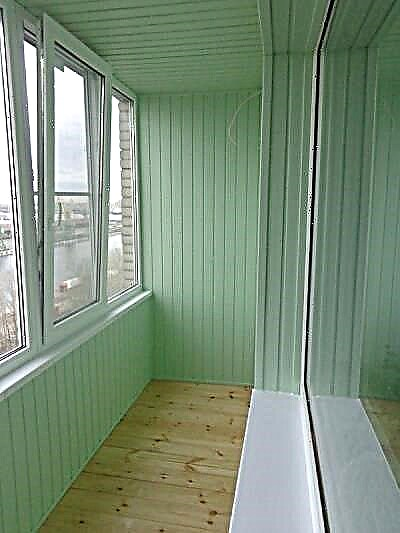
Cladding a balcony with a clapboard - a way to create comfort, and at the same time insulate the room
In some regions, wood paneling is cheap material, in some it is expensive. So you have to compare the price of plastic and wood yourself. Often wood is preferred because it is natural. This is so, but in order to maintain its attractiveness, it is impregnated with protective compounds, and this is chemistry. Then it is painted or varnished. The compositions, as you know, are also far from natural.
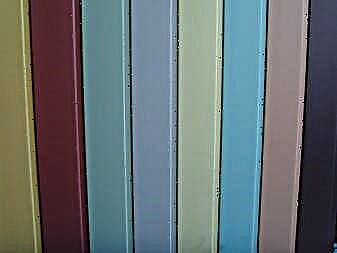
Judging by practical considerations, the lining of the PVC lining is clearly ahead: it is easy to clean, does not require additional care or treatment, and has remained unchanged for many years. Unless on the sunny side it will fade, so it is better to take light colors: on them the loss of color is almost imperceptible.
Wooden lining is more capricious during operation: before installation, it must be covered with protective impregnation. If you are only going to give it some shade, you can choose such an impregnation that will immediately give you the desired color. Then on this its processing will end. If you decide to paint or varnish the finish, then you need to do this after installation (but before installation, soak with antiseptics anyway). During operation, it will be necessary to periodically remove the old coating, and cover it all over again: the varnish or paint may crack, the balcony finish will lose attractiveness. Here is such a hassle.

Which lining you choose for the balcony you decide
Despite all this, deciding which lining is best for the balcony, prefer wood. The tastes, of course, are different for everyone, but by all accounts, a room lined with wood is much more comfortable. As a result, the pursuit of beauty outweighs practical considerations.
How to cover the lining on the balcony, so that it remains attractive for a long time, read the article "How to cover the lining indoors"
Which is better
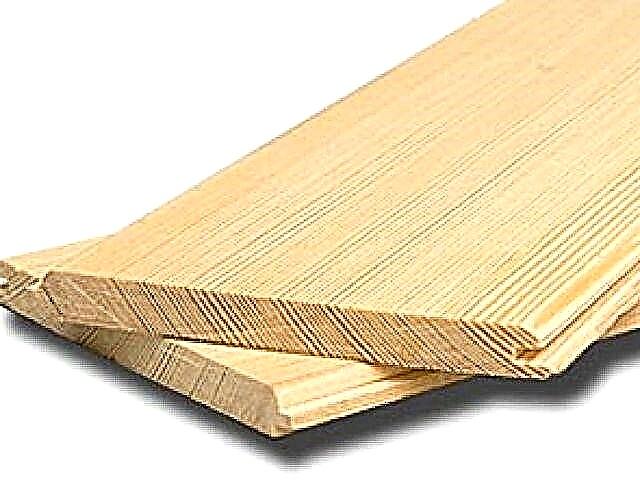
It will be about wooden products. Let's talk about the rocks first. The cheapest lining - from pine and spruce. Despite the relatively low cost, it is durable: coniferous wood contains a large number of resins, which are antiseptics and preservatives. In regions with hot summers, this can lead to the fact that on the sunny side, in places of intense heating, resin will stand out in places. Another minus is soft wood. If you tap on it (decently, for example, with a hammer), a dent will remain. If this does not scare you, you can sheathe the balcony with a pine or fir lining: these are all the disadvantages of this type of wood.
Only you can decide which lining is best for the balcony: everyone has different tastes
There are also more expensive coniferous varieties: larch and cedar. They have a much denser wood, more durable, well resist atmospheric phenomena. But these qualities are absolutely not needed for covering the balcony inside. A more compelling argument is the beautiful color and structure of the wood, as well as fewer resins. Cladding with a lining made of such wood is beautiful and for a long time.
Hardwood is pleasing to the eye. Here, choose to your taste: linden has a slightly pinkish tint, aspen becomes silver-gray, alder has a beautiful pattern, oak in terms of decorativeness and reliability is generally out of competition, but also in price.
Profiles and Appearance
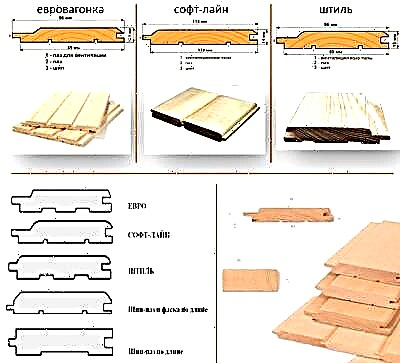
Now about the technical specifications. Let's start with the profiles. On sale there is just a lining, but there is a euro lining. The main difference is that on the back of the Euro option there is one or more longitudinal furrows. They provide air circulation, which extends the "life" of the finish. Also, in theory, lumber with the prefix "euro" has standard sizes and should be made of high quality wood. In practice, everything is different: both the sizes "float" and the quality is far from always good.
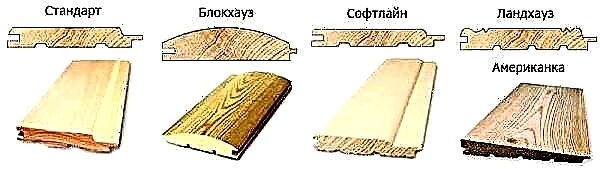
Most Popular Profiles
There are a couple dozen profiles. Different chamfers, “waves” of different sizes and other curly surfaces allow you to get different in appearance walls. In the photo above - the most common, usually produced in large batches.
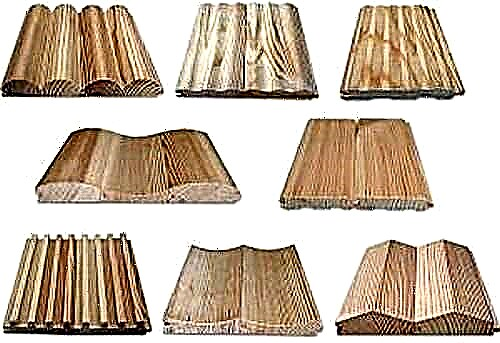
These are some types that can be made to order.
There are several more that can be made to order. Such a “custom” batch will cost much more: you will have to reconfigure the equipment.
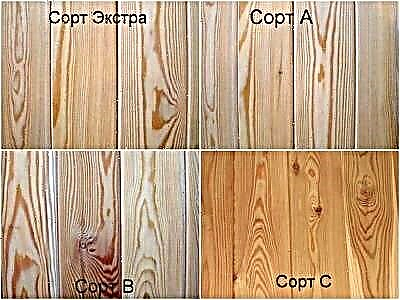
Grades and humidity
The grade of the lining depends on the number of knots, cracks and color changes that hit the board. Grade A or "Elite" should not have them at all, or in very small quantities. Variety "B" - no more than 4 knots of brown color and color changes of a small area, variety "C" can have many knots.
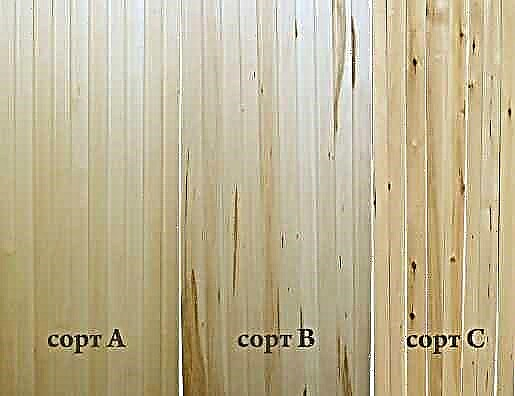
What is the difference between one sort of lining from another
The presence of knots does not mean that the wood is bad. The main thing is that they should be brown, not black and have no signs of destruction. In general, knotty wood sometimes looks great. All this is a matter of taste and preference.
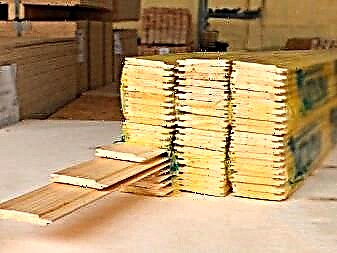
Here with humidity the situation is much more serious. Buying a lining made of raw wood for interior decoration can be much cheaper, but also much more troublesome. If you beat the trim strips with high humidity, it will gradually dry out, decreasing in size. Slots will appear between the boards, some of them will be twisted or bent. You will have to remove, sort and mount everything again. Moreover, maybe twice: it is difficult to predict when the shrinkage will end. Therefore, for interior decoration of the balcony with a clapboard, it is better to take lumber of chamber drying. Humidity then is not higher than 7-10%, it will not “drive” and will not bend: these materials were rejected after drying. Therefore, prices are higher.
About the thickness and width of the strips. For interior decoration, you can take a thin board: the atmosphere is stable. But the balcony is not quite an internal room, the temperature and humidity changes are more serious. Even with good insulation of the balcony. Therefore, the average thickness is suitable - 14-16 mm, but you can use 12 mm.

The width and thickness of the house varies widely
The width of the board can be from 60 mm to 150 mm. Nail narrow longer, with less work, but in a small room, wide stripes “eat up” the volume. So for the lining of the balcony, the optimal width of the lining is average, about 90-120 mm.
How to make a lining of a balcony with your own hands
First of all, it is necessary to decide whether you will insulate the balcony or not, if so, which parts and what material. The structure of the lathing and the thickness of the bars used depend on this. The order of work will change slightly - there will be no installation of insulation. All other steps and their sequence will be similar.
Stages of work and necessary materials
To transform the balcony and give it the appearance of a living room, it is necessary to carry out the following activities:
- Installation of double-glazed windows.
- Sealing of all seams and cracks at the joints of the walls and floor of the room.
- Waterproofing and floor insulation.
- Fastening thin insulation to walls and ceiling.
- Installation of the lathing on all surfaces.
- Fastening between the bars of the crate of insulation materials.
- Installation of lining.
Having an idea of the scope of the upcoming work, you can begin to compile a list of materials necessary for their implementation. So, for insulation and lining of the lining of the balcony, you must have the following:
- Polyurethane foam and "liquid" nails.
- Roll polyethylene having a foil surface.
- Masking tape.
- For the crate, you can use a metal profile or a wooden beam.
- For the main insulation use polystyrene, mineral wool or foam.
- Vapor barrier film.
- Plastic or wooden lining.
- Mounting holders for lining.
- Carnations and screws for wood or metal.
- Anchor mounts-umbrellas for installing foam or foam.
- Furnishing lining - corners and skirting boards.
- Varnish or paint, preferably water-based, for coating wood.
- Primer for walls.
Depending on the material from which the crate will be installed, auxiliary materials are also selected.
Of course, during work you can not do without construction tools, of which you will need:
- Screwdriver.
- Pliers.
- Hammer.
- Hand or electric saw or jigsaw.
- Electric drill, hammer drill.
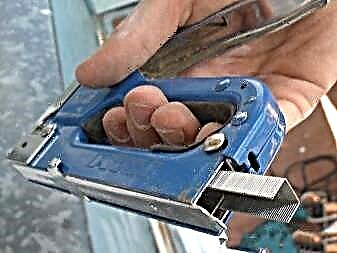
- You may need a stapler if the lining is fastened with brackets.
- A wide brush or roller for varnish or paint.
- Building level.
- A simple pencil, ruler, construction level, plumb line - for marking and control.
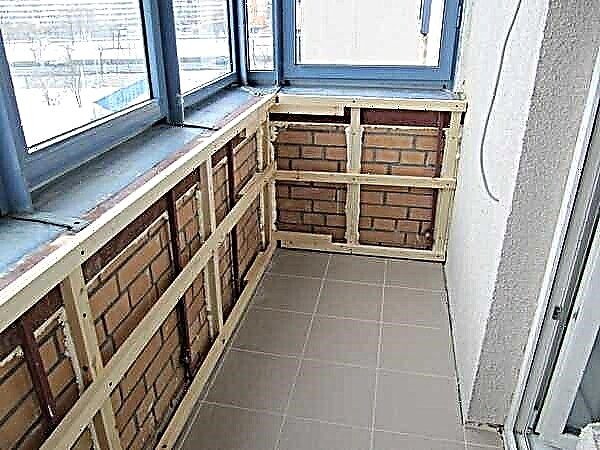
Preparing walls for cladding
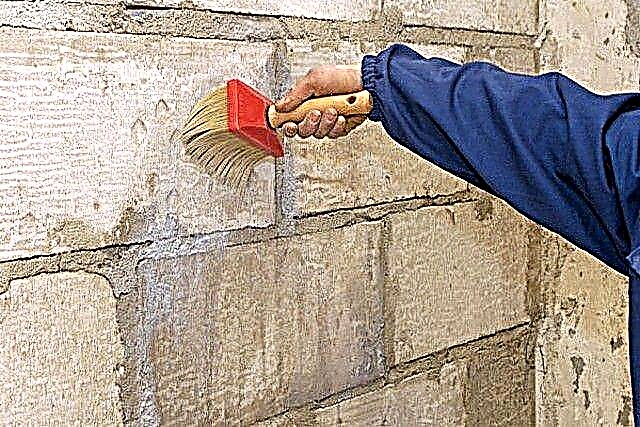
- Work on the arrangement of the balcony, you need to start with closing up the cracks, which are almost always present at the joints of the walls. This is simply explained - moisture and dust through cracks and wide cracks can penetrate into the space between the wall and lining, which will lead to damage to thermal insulation and finishing materials. The insulation in this case will greatly reduce its functionality, mold may form in it or even insect nests may appear.
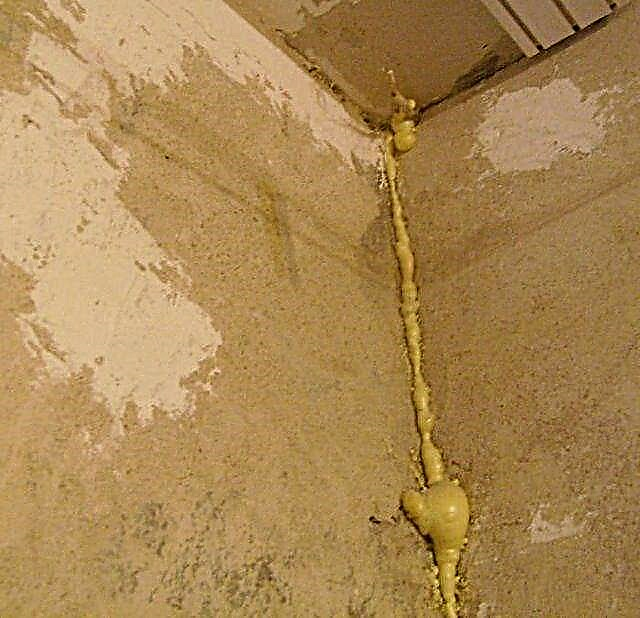
Termination is carried out, as a rule, using mounting foam. In order for this material to have good adhesion with wall materials, it is recommended to first treat all cracks with a primer. Further, without waiting for the applied soil to dry completely, it is possible to fill the joints with foam directly on a wet surface.
After it hardens, you need to cut off the excess that will come out, as they will interfere with the installation of the crate.
- The next step is the primer of the entire surface of the walls and ceiling. The antiseptic penetrating composition has the task of reliably bonding the surface of the wall, hardening it and protecting it from the development of microbiological life forms (mold, fungus). The composition is applied using a roller, in the corners and cramped places it is better to use a brush. The primer on the walls and ceiling should dry completely. It is best not to stint, and apply it in two layers - the second is applied after the first dries.
- On top of the insulation, the crate is fixed. The size of the bar for it must be selected in accordance with the thickness of the purchased insulation, since it will later be stacked between its guides. The distance between the bars of the crate should be less than the width of the insulation mats by 30 ÷ 40 mm - if mineral wool is used, and in the case of using rigid heaters, such as expanded polystyrene, equal to the width of the panels.
Even before assembling the bars, you need to immediately determine how the lining should be arranged, as planned by the master, horizontally or vertically. The direction of fastening of the crate will depend on this. With horizontal fastening of the finishing material, the battens are installed vertically, or, conversely, the lining is vertical and the battens are horizontal.
- The most difficult nodes for installing the lining on the balcony are the slopes of the doors and windows, due to their small area. On them you need to manage to also install a crate, and, in addition, the bars are also installed around the entire perimeter of the window, on the outside of the slopes.
Mounting the bars of the lathing on the walls, they are exposed according to the construction level, since this moment will determine how exactly the lining will be installed vertically, and therefore the general appearance of the balcony trim.
The metal profile can also serve as a crate, but you need to remember that the metal conducts cold well, and, in addition, it will be more difficult to fix the lining on it.
The crate is also made on the ceiling, if it is also planned to finish it with a lining.
- The next step is the installation of insulation.
If mineral wool is used, then it can easily be installed between the guides of the crate, as it is flexible and compresses easily, and then, when straightened, is firmly pressed against the bars or the metal profile.

When using hard material, such as foam or foam, gaps may form between the batten guides and the insulation, which must be repaired with mounting foam.
If necessary, the insulation is additionally pressed against the wall with the help of fasteners-fungi.
Insulation is also laid on the ceiling and fixed in accessible ways.
Further, it is recommended to tighten the insulation with a vapor barrier film, after which it is possible to proceed to cladding the walls and ceiling.
What is good lining
Wooden lining is a finishing material made of natural wood, preserving all its advantages - heat-insulating properties, natural warmth, respectable textured appearance. No wonder wood has not gone out of fashion for many centuries and is still popular.
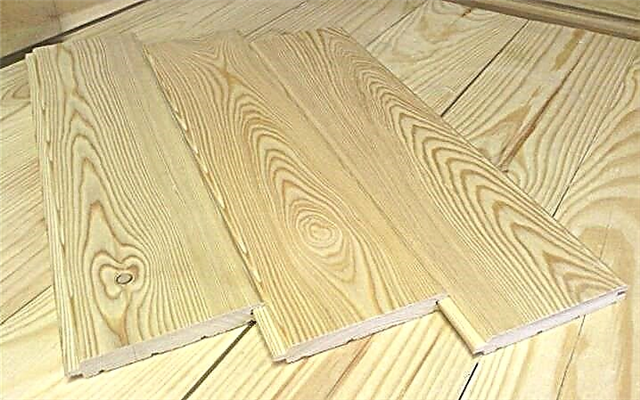
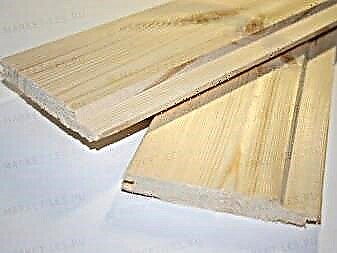
For the manufacture of lining for the decoration of balconies, conifers, such as cedar, larch or pine, are most often used. The lining itself is usually divided into several types according to the design of the locks and according to the appearance of the front side of the board.
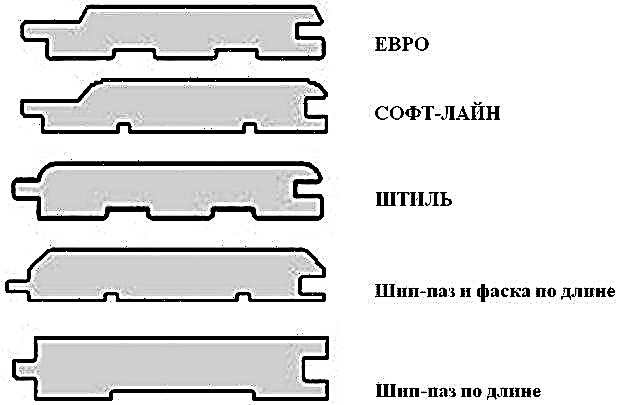
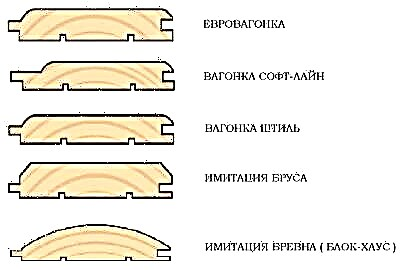
- A simple lining has a quarter connection, and chamfers on both sides of the board. It is more suitable for laying on the floor, but sometimes it is also used for walls. The convenience in installing this type of material is that it does not have to be knocked together - the grooves are very freely connected.
- Euro lining is made according to European quality standards. As a rule, it has a thorn groove connection, as well as chamfers on both edges of the front side of the board. For this type of lining, wood is used having a moisture content of not higher than 11 ÷ 12%.
- Soft-lining or “smooth line” has rounded chamfers on the front side, so it looks unusual on the wall. The chamfer on one side smoothly passes into a flat surface, which is located below the main one.
- Lining, called "calm", is made from well-dried wood. It is characterized by a thorn-groove connection, which is located above the middle of the thickness of the board, as well as small rounded chamfers.
- Another type of lining having a thorn-groove lock, which is located below the middle of the thickness of the lining, and chamfers on the front side. Therefore, when it is combined, an interesting wavy surface is formed.
- Lining with a flat front side without chamfers is one of the most popular for finishing balconies. It has a thorn-groove connection, which is located exactly in the middle of the width of the board. When assembled, this lining option forms a flat surface with barely noticeable connecting lines.
Features, advantages and disadvantages
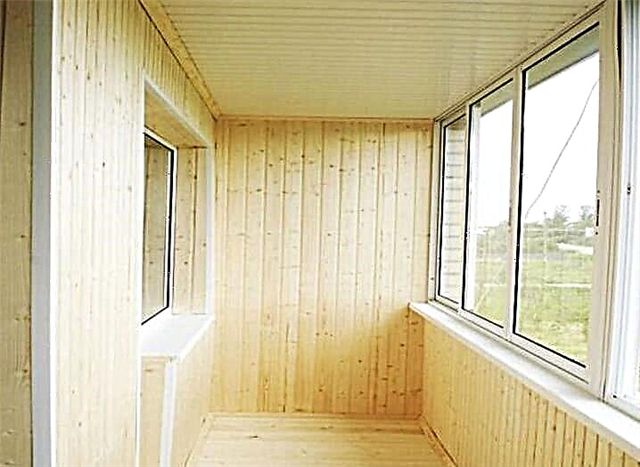
Cladding a balcony with a clapboard is a popular and common solution. The material is easy to process and install, affordable and has attractive external characteristics.
Initially, the lining is a well-planed wooden board, but now it can also be made from other raw materials. However, it is natural material that has the best characteristics.
The advantages of lining include:
- Strength. Natural wood is resistant to external mechanical influences, there are no scratches on it.
- Safety and environmental friendliness.Lining does not emit harmful substances into the air, it is non-toxic.
- Long service life. The operating time of the skin can be up to 20 years, if it is installed correctly.
- Thermoregulation. The lining absorbs the sun's rays and together retains heat indoors.
- Noise suppression. The material absorbs sounds from the street, making it quiet on the balcony.
In addition, during installation under the lining, wires and communications are hidden, which is important when upgrading a living room. The lining can not be painted, which reduces the time of repair work. A plus is the ease of care. If dirt appears, simply wipe the material.
Due to the natural structure, the lining is pleasant to the touch. It contributes to the creation and maintenance of the microclimate in the room, participates in air circulation. Therefore, a comfortable temperature will be maintained on the balcony both in cold and warm times. It also guarantees the maintenance of a constant level of humidity.
This material has several disadvantages:
- One of the drawbacks is associated with the structural features of the lining: it is light and quickly ignites.
- Like all wood products, the lining is sensitive to moisture and sudden changes in temperature. To avoid premature damage, the boards are treated with special compounds.
- In addition, if the operating rules are violated, the materials are deformed.
Which is better to sheathe?
Lining is of several types, differing in operational and external characteristics. The choice of material depends on the specifics of the installation of boards and their care, as well as the interior of the future residential premises. You can sheathe a loggia with one of the following types of lining.

Wooden
Natural material with all the ensuing benefits. Lining is made in the form of thin panels of various sizes. The beams are made from different types of wood: ash, oak, alder, cedar, linden, spruce, pine, larch. The material "breathes", does not allow air to stagnate on the balcony. An unusual feature of the casing is a pleasant, fresh aroma. It comes primarily from coniferous boards.
Depending on the quality of the raw materials, the lining is divided into types:
- Consider material labeled Extra as the best. Boards are well processed, devoid of external flaws. The cost of such material is higher.
- Class "A" allows the presence of small knots, but is characterized by high strength.
- Medium quality wood is used to create a class B lining. Cracks and resin pockets may be located on the uneven bars.
- The lowest quality material has a class "C". Lining is poorly sanded, easily deformed. On the boards are captive knots up to 25 mm in size, through cracks, stripes and other defects.
It is used for cladding pantries, technical and auxiliary rooms.
Eurolining
A kind of wood paneling. Externally, these types are very similar, but the eurolining is of higher quality, since it is manufactured according to European standards. Such material is more expensive, the price is due to high performance. Eurolining is stronger, made from the best varieties of wood.
The material is divided in size and shape. Allocate standard profiles, softline, landhouse, landhouse, American, block house.
The most popular top is the latter. Externally, the model looks like a bar on one side in the form of a cylinder.
Eurolining is done taking into account strict requirements, including those related to its size. It has a thickness of 13, 16 or 19 mm, and the width is 80, 100, 110, 120 mm. The length of the beam is 500-6000 mm.
Plastic
Building materials are made of PVC, vinyl, have good heat and sound insulation characteristics. The life of a plastic lining reaches 30 years.
Polyvinyl chloride is classified as an environmentally friendly raw material: it does not contain harmful chemical compounds, which is confirmed by sanitary certificates.
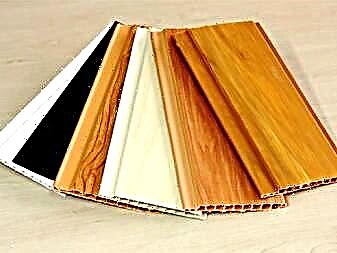

Plastic bars are easy to install, guarantee a tight joint. They are resistant to ultraviolet rays, do not fade in the sun. The material is not afraid of cold and hot weather: the working temperature range for it is from -50 to +50 C. A wide variety of bars design allows you to choose them for any interior. Manufacturers create a plastic lining that imitates natural materials, decorated with drawings or patterns.
The listed materials have their pros and cons. Plastic panels are a cheap analogue of wooden beams and even have a longer life. However, it is precisely wood planks that are associated with nobility and comfort. Wooden lining is more resistant to sudden changes in temperature, but plastic is resistant to fire.
We make a calculation
Before carrying out repairs, it is necessary to determine how much material is required. A correctly carried out calculation will avoid the purchase of extra boards and will not allow you to throw money away.
For the lining, they take the lining itself and wooden bars, for the purchase you need to know their dimensions:
- The first step is to calculate the area of the room. To measure length, width and height, you will need a tape measure or ordinary measuring tape. From the resulting values, the area of the doors and window openings is subtracted. Due to the uneven surface and the characteristics of the fasteners of the rails, the usable area may be lost, and several boards may be damaged during the work. For this purpose, another 8-10% is added to the final figure.
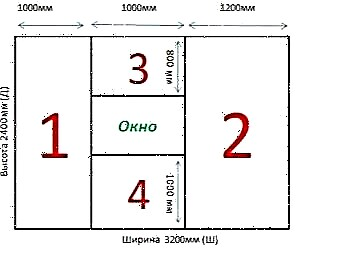
- To calculate the number of lining, the area of the room is divided by the area of one board. For standard size slats (60x9.5 cm) this value will be 0.52 m2.
- It is necessary to determine the number of bars used for mounting the battens. The standard dimensions of the part are 50x40 cm. The height of the processed surface is divided by the interval between the guides (0.6) and multiplied by the length. The square footage of the beam is obtained by adding the learned values.
- Before buying, you need to clarify the dimensions of the profiles of a particular brand. You can do this with consultants in a hardware store or on the manufacturers website. As a rule, companies place special calculators for calculating materials.

Necessary tools
To install the lining with your own hands, you do not need specialized professional equipment, and this is its plus. The list varies depending on the type of material selected, but in general terms, the list of tools includes:
- Hammer drill, hammer drill,
- Drill with a diameter of 4 or 6 mm,
- Screwdriver (electric or cordless),
- Boer,
- Hacksaw, jigsaw,
- Building level, body kit, nylon cord,
- Bat cross,
- hammer, ax.

To take measurements, you will also need a tape measure, a square and a pencil, fasteners are carried out using nails with large caps (60 mm), wood or metal screws (50, 75 and 90 mm) and anchor mounts-umbrellas. And during the finishing work, details will be needed for furnishing: corners and skirting boards.
How to sew with your own hands: step-by-step instructions
Finishing the balcony is a few steps:
- At the first stage, preparatory work is carried out, the purpose of which is the cleaning of surfaces from old paint, whitewash and other finishing materials. It should be removed and the window slopes, windowsill and skirting boards - you get a box without everything.
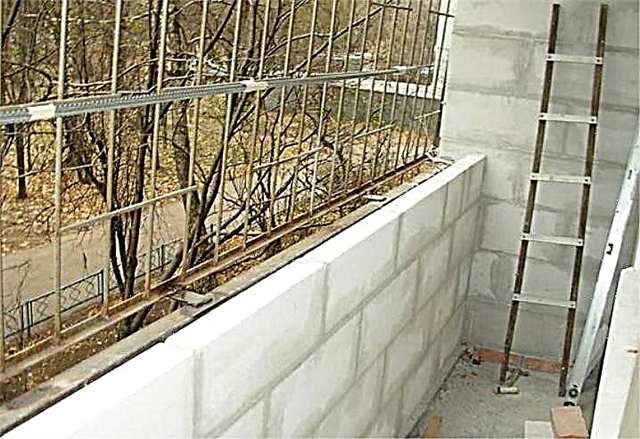
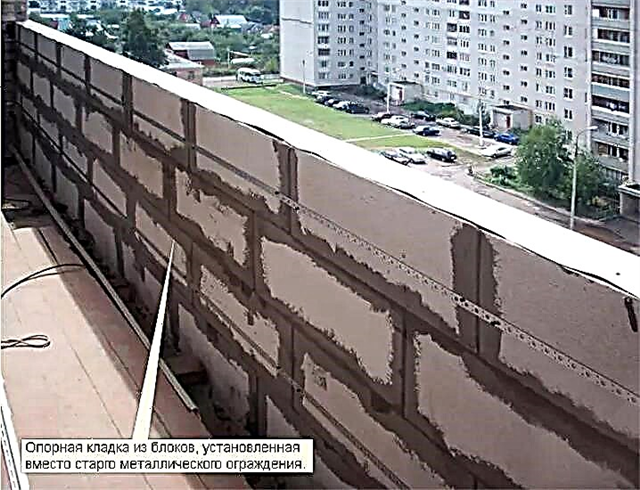
- Before cladding, an inspection of the frames is carried out. Rotten parts are replaced, an antiseptic is applied to the surface to prevent damage to the lining. To prevent the appearance of the fungus, it is necessary to treat the surfaces facing the north side, as an option, a film with waterproofing properties is placed under the frame. The gaps between the boards and the walls are filled with foam. When the balcony railing is made of metal sheets, a layer of foam blocks is created, which is laid on the cement mortar.
- The surfaces on which the lining is laid should be as even as possible: so the lining is longer than the service life. Existing tubercles and cracks are smoothed out with a primer, it is recommended to apply it in two layers. Before proceeding to the next step, you must wait until the solution has completely dried.
The final result of all work depends on the installation of the crate. Reiki are perpendicular to the boards of the lining. Pre parts for the frame are also treated with antiseptic agents. When repairing it is important to follow the sequence of work. The first are mounted rails under the ceiling (at a distance of 10 cm) and at the floor (indentation is 3-5 cm).
The steps of installing the crate:
- The rail of the required length is cut off. Marks are made on the beam at regular intervals. Using a drill, which is correlated in diameter with the size of the fasteners, holes are created.
- The beam is applied to the wall, at the place of future fastenings, holes in the wall are drilled 5-6 cm deep.
- For fasteners, self-tapping screws are used and initially they are not completely screwed in to check the evenness of the parts.
- The screws are driven in with a hammer, leaving about 10 mm. Then they are twisted so that the structure holds most tightly.
The remaining bars are set in the same way. After installing the two parts between them, other elements of the crate are marked. For this purpose, nylon cords are pulled vertically. The intervals between the bars should not exceed 60 cm. The frame is mounted on all walls and ceiling.
Guides are also packed around the openings. They are nailed vertically and horizontally in the same plane with the frame. If you plan to insulate the loggia, the details are stacked between the slats. Roll materials can be glued directly to the walls, then stuff the frame on top.
When the balcony is treated in humid climates, waterproofing can be applied to the surfaces before installing the battens.

The process of covering the balcony is simple, especially if the guides were correctly installed before that. Wooden lining is laid in two ways, the installation of plastic materials also has distinctive features.
Open mount
For installation, self-tapping screws and nails are used, with which the panels are screwed to the frame. This is a simple and quick way of lining, but it loses in terms of aesthetic characteristics, since the appearance of the lining is spoiled due to sticking screws.
With hidden mount
When performing work, nails are driven into the inside of the groove, and the hats are recessed so that they do not interfere with the installation of the following elements. Clamps made of a metal plate can be used as fasteners. Installation is made from one corner to another. Clamps are inserted into the grooves and screwed with screws. Subsequent panels are installed in the grooves of the previous ones, the procedure is repeated until the very end.
Plastic lining
Before starting work, a corner is installed in the corner. It is attached to the frame using a construction stapler, then a panel is inserted into the part. The lining is equipped with a thin extension - in this place the brackets are installed. The next element is inserted into the groove, so do with all the boards until the work is completed. Sometimes it is necessary to trim the last board so that it fits the width of the wall.
At the last stage, finishing work is done. The lining is recommended to cover with a solution to protect against burnout under the influence of sunlight. For these purposes, use varnish that is resistant to unstable temperature conditions, bioprotective impregnation, preventing the appearance of putrefactive formations and mold. Additionally, natural wood boards can be painted to emphasize the shade and texture of the material.
A more detailed process of decorating a balcony with clapboard can be seen in the following video:
Interesting ideas
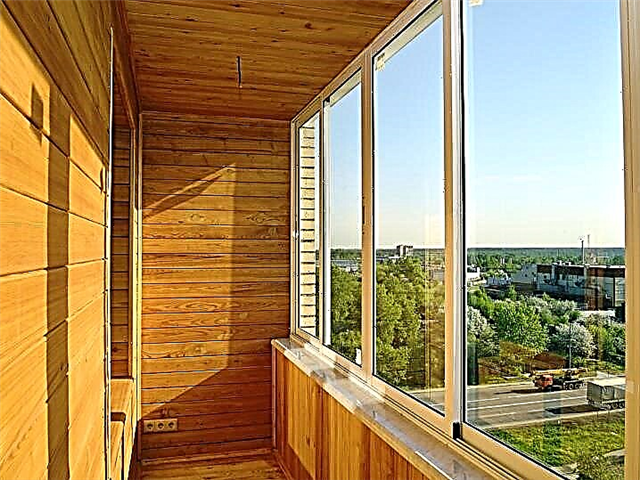
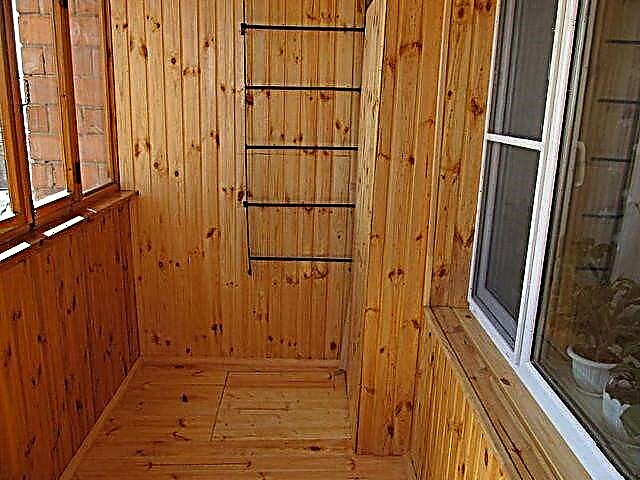
Wooden materials look advantageous in any room. The luxury of wood will give the balcony coziness, and the natural shades of brown will act in a soothing way. The original solution will be covering the floor and walls with panels of different colors.
This will give the design of the loggia conceptual, will make a modern interior.
More restrained is the option with skirting boards in contrasting shades. Details will not only hide irregularities and crevices, but also shade the color of the main coating. Elements should be selected several tones darker than the lining.
You can also sheathe corners, window openings.
Natural wood fans can go further and build furniture of the same color as the lining. A table and a bench made of wood will look like a continuation of the walls. In addition, this will save space, since the furniture will be located in the corners.
Together with natural materials, knitted decorative elements and stone decorations will look advantageous.
The order of work - step by step instructions
First, all the old finish is dismantled, the plaster, paint, tile, which does not adhere well, is removed. Everything that holds firmly can not be touched. For greater reliability, before lining the balcony with a clapboard, it is worth priming the walls, floor and ceiling with an antifungal composition. This is especially true if it was previously open. After the composition dries up, the actual installation work begins:
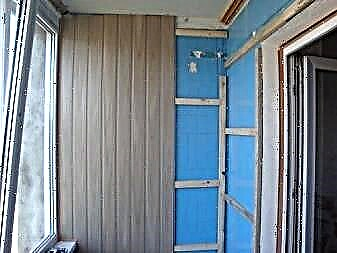
- On the walls and ceiling, a crate is stuffed. It is usually made of wooden blocks. If the balcony or loggia is insulated, the step of installing the slats is consistent with the width of the insulation.
- Insulation is installed and fixed.
- Floor logs are mounted.
- Between them fit insulation.
- Moisture-resistant plywood is laid on top with a thickness of at least 10-12 cm, fixed in the logs with self-tapping screws.
- Mounted lining on the wall.
- Mounted ceiling lining.
- Floor and ceiling skirting boards, corners, slopes are installed.
Further on some stages and materials in more detail.
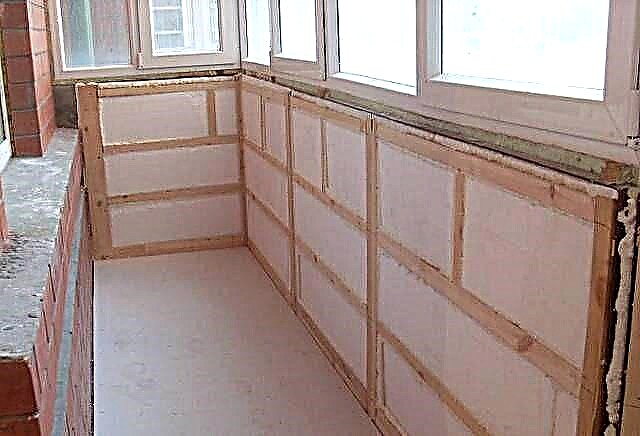
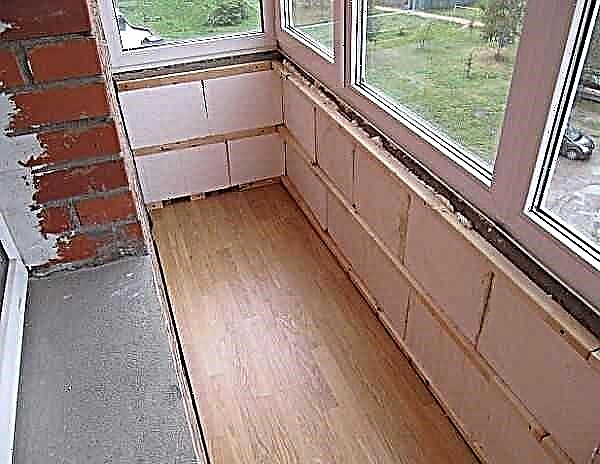
What to insulate
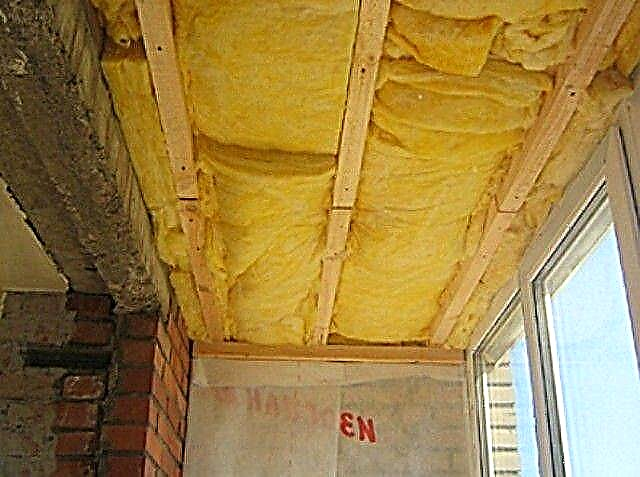
Before lining the balcony with a lining, it is necessary to lay a heater. Any of the heat-insulating materials available on the market is suitable:
- The cheapest is polystyrene (PSB). Available in the form of plates. It has good thermal conductivity (see the graph). Its main drawback: it can not stand the load - hesitates, but under the lining this drawback is unimportant. The second point, which many do not like, is unnatural and can emit harmful substances. One cannot argue with unnaturalness, and the second statement is only partially true. Under normal operating conditions, the foam is chemically neutral and harmless. It releases harmful substances only when burned. Another negative quality: it has low vapor permeability (does not remove vapors). But this is the reverse side of insulation. Too much moisture today is managed with the help of a ventilation system.
You can insulate the balcony under the lining with foam
Mineral wool has good characteristics, but they are afraid of moisture
Extruded polystyrene foam has a high density and low thermal conductivity
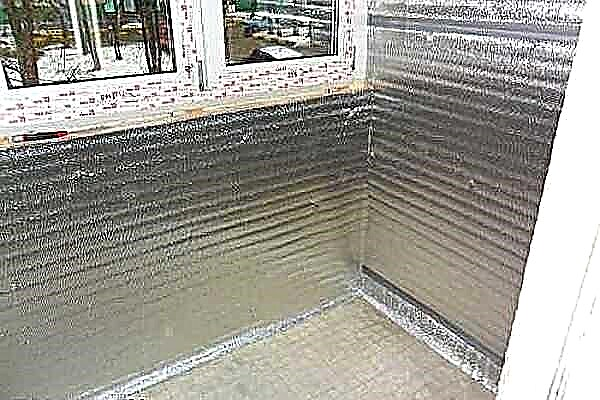
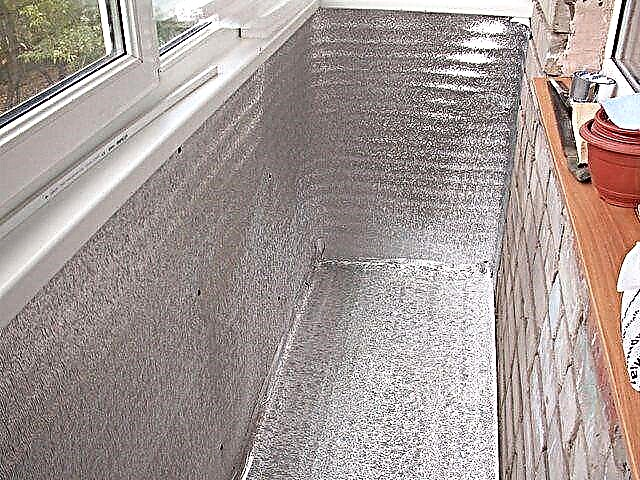
Foil polyethylene is nailed over the insulation to reduce heat loss and prevent the penetration of steam into the insulation
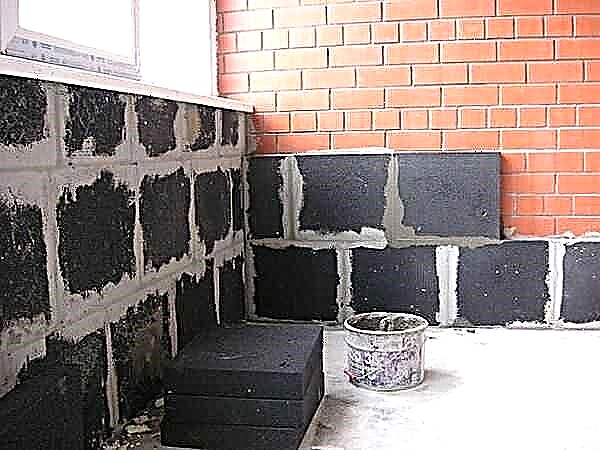
Foam glass - a natural thermal insulation material with very good characteristics
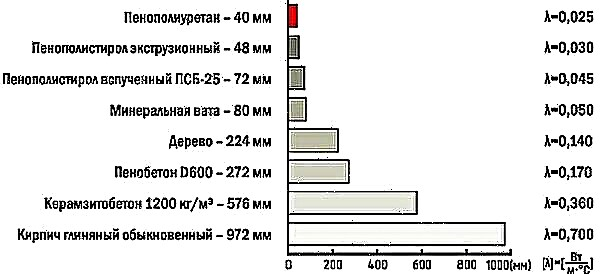
Comparison of thermal conductivity of various thermal insulation materials. In centimeters, the required thickness of the material is indicated to ensure equal heat losses
Any of these heaters can be used on the ceiling, floor or walls. For the floor there is a natural and inexpensive option - expanded clay, but it is far from being as effective as the materials presented above: the average thermal conductivity is 0.1 W / (m · K) (two times higher than that of the mineral wool).
How to sheathe a balcony with a lining
The lining of the balcony is technologically not much different from the decoration of other rooms: first the frame is assembled, then the lining board is nailed to it.It is necessary to horizontally and vertically align the crate, and then correctly set the first bar on the wall or ceiling, since the installation of all the others is from it. Then the second is beaten to the first board, then the third, and so on, to the corner. On the next wall, everything repeats again.
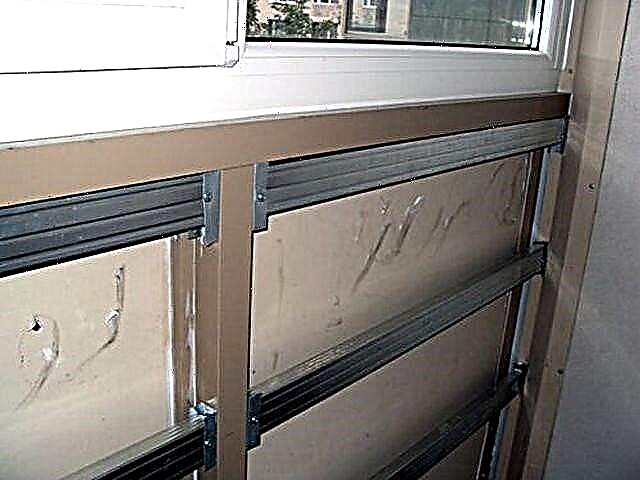
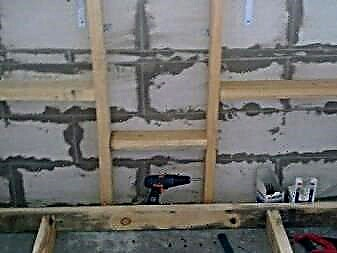
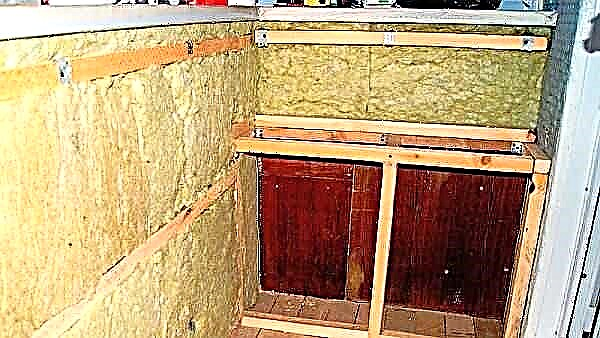
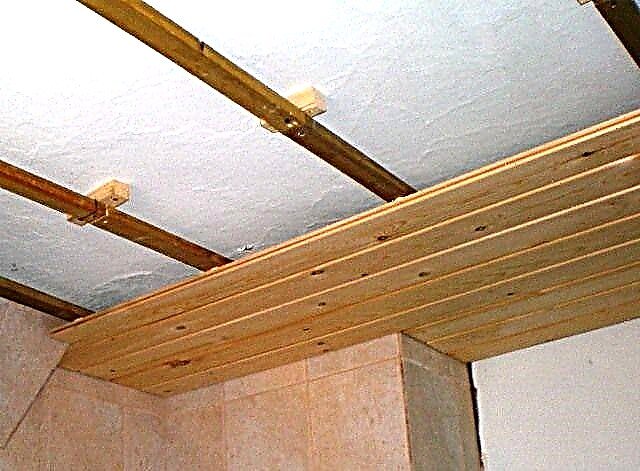
Making the crate
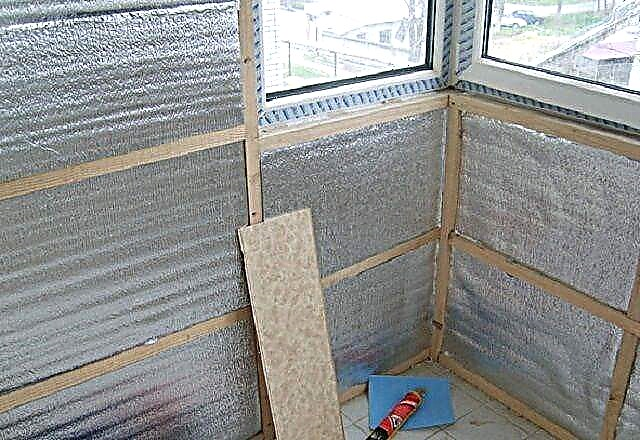
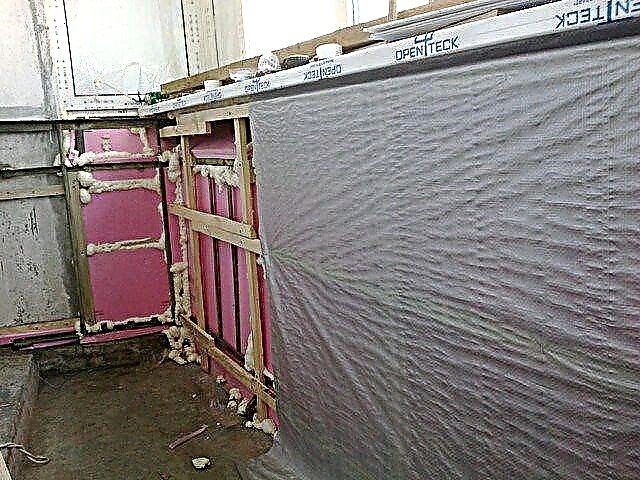
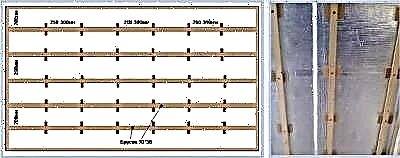
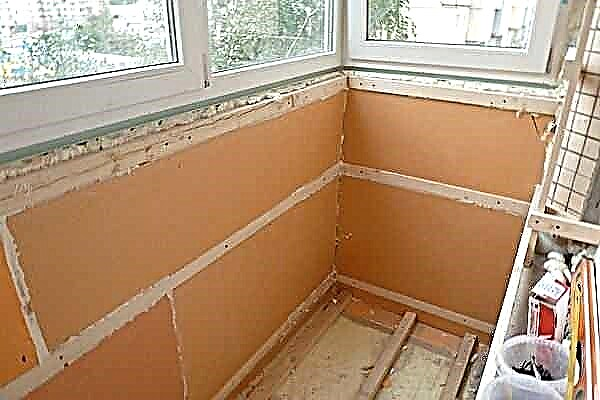
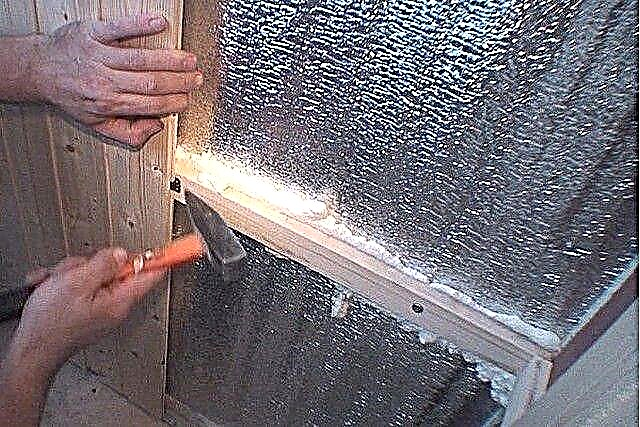
Cladding lining begins with the creation of the frame - lathing. It is most often made from a bar. The section is selected depending on the thickness of the insulation (if any). The bar should be sized so that a gap of 1.5-2 cm remains above the surface of the insulation. This gap will allow maintaining the normal humidity of the insulation and wood, which will prevent the formation of fungi and mold.
If the beam of the required size is too expensive, you can save. Under the crate, they take a bar of the same thickness as the insulation (or a little more). It is mounted between the guides, and on top of it, perpendicularly, they fill the counter-lattice. It is made of planks with a thickness of 1.5-2 cm. They then give the required clearance. Only in this case you need not to get confused with the direction of mounting the lining.
An example of a battens for a lining of a balcony
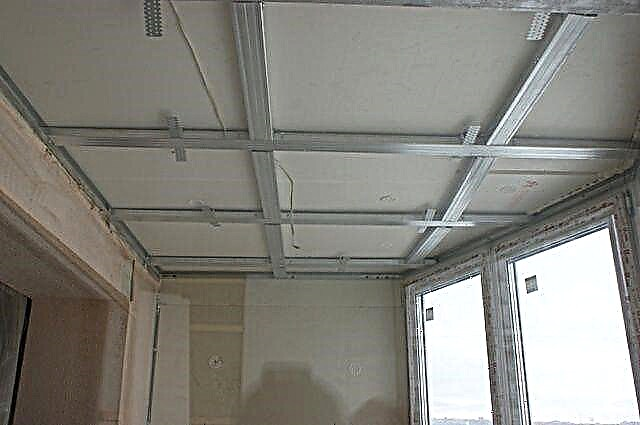
Lining cladding can be vertical or horizontal. The battens of the crate under it are installed perpendicularly. If the finish will be mounted vertically, then the lathing under it should be located horizontally.
If there is a counter-lattice, the rules change: the primary crate is also packed (vertically), and the counter-crate is horizontal. With such a system, the trims will be mounted vertically.
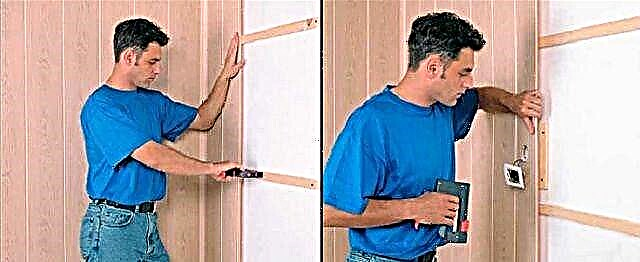
More often, the lining on the balcony is done vertically. Accordingly, the installation of the battens can begin with the bar below the window unit. It is set horizontally, checking the level in two planes. If the wall is uneven, in the right places they install wooden or plywood linings of the required thickness. Fix the crate with dowels.
Planks are necessarily stuffed around the perimeter of the walls and ceiling, departing from angles of 30-40 mm. Also be sure to stuff around the perimeter of window and doorways. Then the intermediate bars are fixed: one plank from the other should be at a distance of 40-50 cm. It turns out on the walls and ceiling the frame, to which the lining is then attached.
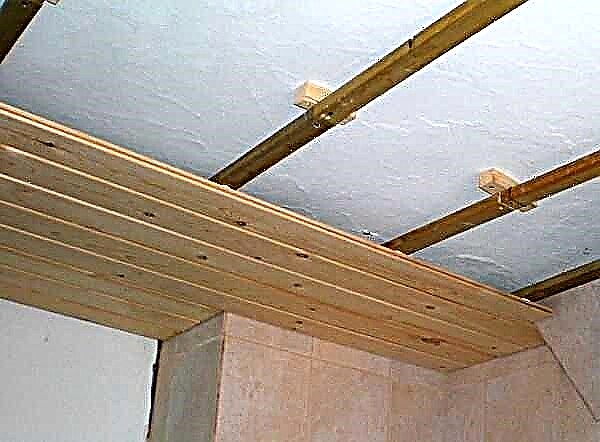
A similar structure is assembled on the ceiling
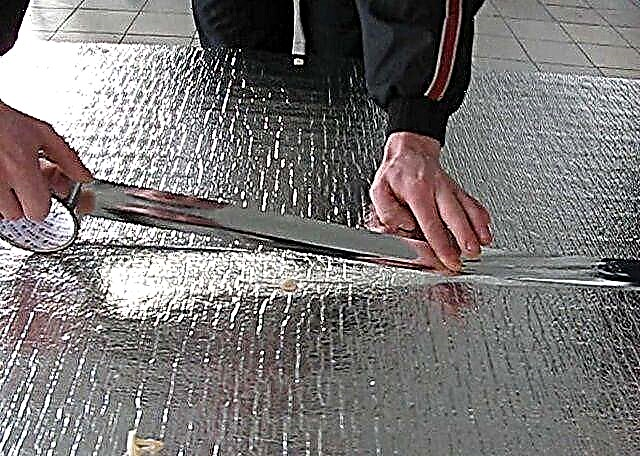
Lining boards are cut a little shorter than the required length (0.5-1 cm). This is necessary to compensate for dimensional changes at high temperature and / or humidity.
Mounting the lining on the walls and ceiling
- Choosing the right type of lining and preparing a crate for it, you can proceed to the processing of wood.
This is done with special antiseptic compounds that protect the structure of the material from the onset of fungus, mold, insects. The composition applied to the surface of the lining should dry well. Many types of lining sold in stores have already undergone factory antiseptic treatment - this should be indicated in the product passport. In this case, you can skip the step.
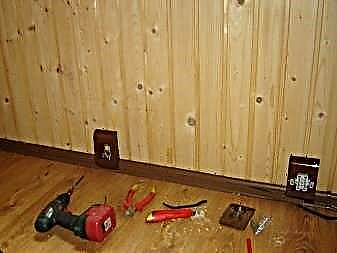
- While the lining will dry, you can start conducting electric and antenna cables, if the installation of lighting devices, sockets and a TV is provided on the balcony.
Communication is best to put between the bars of the crate, drilling them in the right places. When the lining is installed, it will hide the unaesthetic appearance of the wires.
Next, you can proceed with the installation of the ceiling and walls with decorative material. It is better to start work from the ceiling, as this is the most complex and time-consuming process.
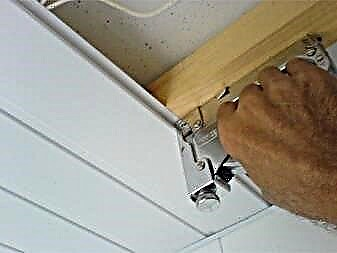
- Installation of lining begins from the wall, carefully measuring each of the installed boards. Do not immediately cut the material into many identical parts, as for some places on the ceiling you may need a board a little shorter or longer.
- The first board is attached to the wall with the help of studs or self-tapping screws, through and through - the place of the hat can then be covered with a baseboard or a decorative corner.
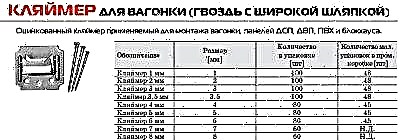
The opposite edge of the first lining is attached to the crate with the help of special metal elements - hidden brackets-holders, which are often referred to as clamps. They allow you to install without clogging the cloves or screwing screws directly into the edges of the lining. Kleimers are put on the lower plane of the groove of the board at the level of the passage of the guides of the battens. There are holes that are located at such a distance that through them this element can be fixed to the crate using a stapler or studs.

- The next board is inserted with a pin into the groove already installed, and then also fixed using the holders. Work continues in the same order to the end of the ceiling. It is possible that the last lining will have to be cut in width. Cutting is carried out from the side of the groove of the board. After installing the last board, its edge is also fixed through with nails or self-tapping screws.
After completing the installation of the ceiling, go to work on wall decoration.
- Installation also starts from the corner, and the first board of the lining is exposed vertically, necessarily in level, since the corners in modern apartments are far from always perfectly even.


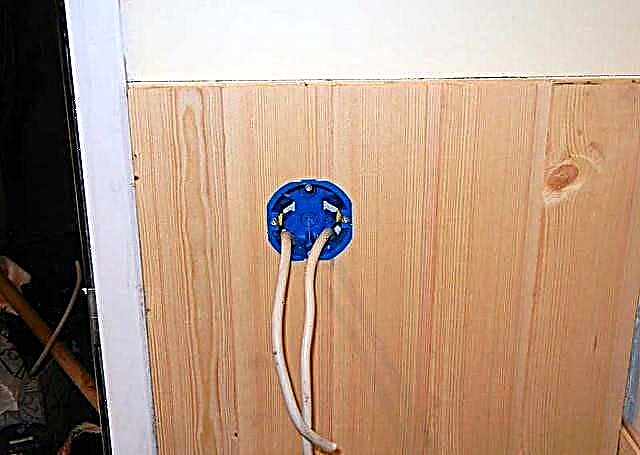
When the board with the hole is fixed, you can immediately install the outlet (switch), fixing it on the lining or on the crate.
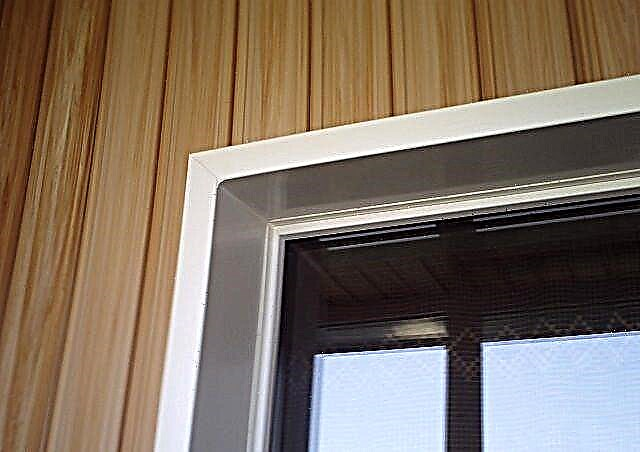
- Very painstaking work remains when installing the lining on the slopes. This operation must be carried out very carefully, adjusting the boards in size and exposing them in level.

There is a more convenient option for the design of these architectural elements - these are ready-made plastic slopes that are easy to install, but will cost slightly more than those made independently from the lining. Such slopes look neat and aesthetically pleasing, visually combine perfectly with wood.
- Upon completion of the installation of the finishing material, it is necessary to install ceiling and floor skirtings. In the corners, special decorative corners are installed that will close the lining connection at the joints.
- The final stage of the work is varnishing of wood. Work can be carried out with a brush or roller.

The choice of tool in this case will depend on the consistency of the paint material. It is very important to ensure that when applying varnish there are no smudges left, otherwise the surface will look messy and the aesthetic effect will be lost.
Knowing the technology of the wall cladding process, the work can be done independently. This will save quite a “round” amount, spending in the end only on materials.
Prices for various types of lining
Next, you can proceed with the installation of the ceiling and walls with decorative material. It is better to start work from the ceiling, as this is the most complex and time-consuming process.
 Facing is better to start from the ceiling
- Installation of lining begins from the wall, carefully measuring each of the installed boards. Do not immediately cut the material into many identical parts, as for some places on the ceiling you may need a board a little shorter or longer.
- The first board is attached to the wall with the help of studs or self-tapping screws, through and through - the place of the hat can then be covered with a baseboard or a decorative corner.
The opposite edge of the first lining is attached to the crate with the help of special metal elements - hidden brackets-holders, which are often referred to as clamps. They allow you to install without clogging the cloves or screwing screws directly into the edges of the lining. Kleimers are put on the lower plane of the groove of the board at the level of the passage of the guides of the battens. There are holes that are located at such a distance that through them this element can be fixed to the crate using a stapler or studs.
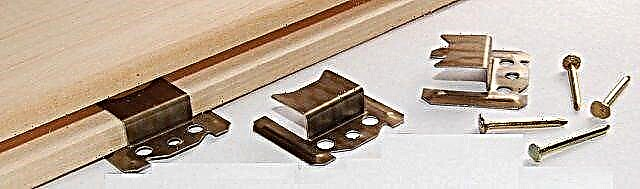 Hidden brackets-holders (kleimers) for mounting the lining
- The next board is inserted with a pin into the groove already installed, and then also fixed using the holders. Work continues in the same order to the end of the ceiling. It is possible that the last lining will have to be cut in width. Cutting is carried out from the side of the groove of the board. After installing the last board, its edge is also fixed through with nails or self-tapping screws.
After completing the installation of the ceiling, go to work on wall decoration.
- Installation also starts from the corner, and the first board of the lining is exposed vertically, necessarily in level, since the corners in modern apartments are far from always perfectly even.
 Mounting wall paneling
 - The installation process itself does not differ at all from the one described above (on the ceiling). Hidden holders are also used, fastened to the guides of the crate.
 Fastening the hidden holder (kleimer) to the batten guide
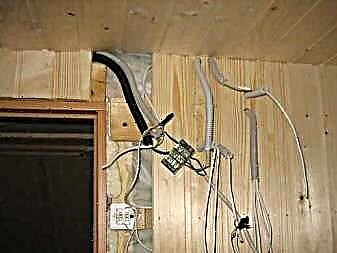
 - In those places where it is planned to install sockets or lamps, a neat circle is drilled in the lining, through which the cable for connection is drawn.
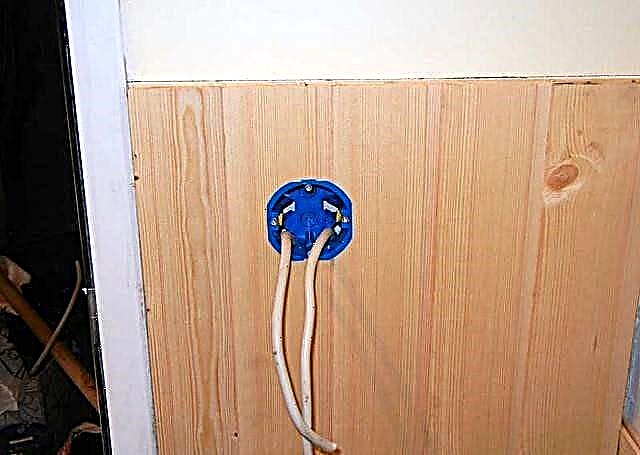 Sockets, switches are installed immediately, wires for the lights are displayed
When the board with the hole is fixed on, you can immediately install the outlet (switch), fixing it on the lining or on the crate.
- Very painstaking work remains when installing the lining on the slopes. This operation must be carried out very carefully, adjusting the boards in size and exposing them in level.
 A very difficult task is the accurate cladding of the window and door slopes with the lining
There is a more convenient option for the design of these architectural elements - these are ready-made plastic slopes that are easy to install, but will cost slightly more than those made independently from the lining. Such slopes look neat and aesthetically pleasing, visually combine perfectly with wood.
 The task can be simplified if you use ready-made modular slopes made of PVC.
- Upon completion of the installation of the finishing material, it is necessary to install ceiling and floor skirtings. In the corners, special decorative corners are installed that will close the lining connection at the joints.
- The final stage of the work is varnishing of wood. Work can be carried out with a brush or roller.
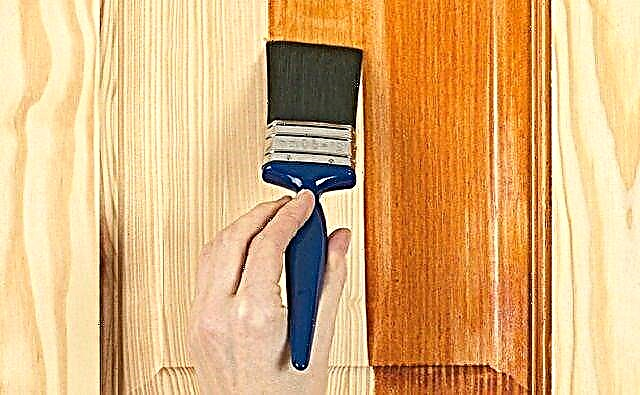 Varnishing the surface will be the final stage of work
The choice of tool in this case will depend on the consistency of the paint material. It is very important to ensure that when applying varnish there are no smudges left, otherwise the surface will look messy and the aesthetic effect will be lost.
Lining Installation Instructions
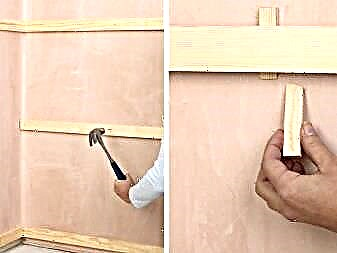
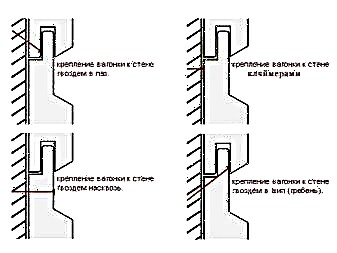
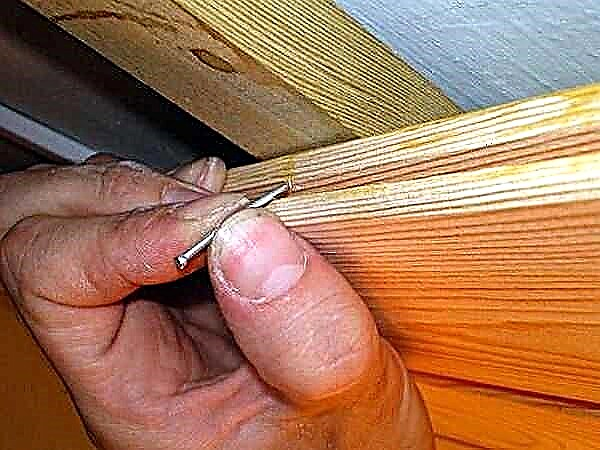
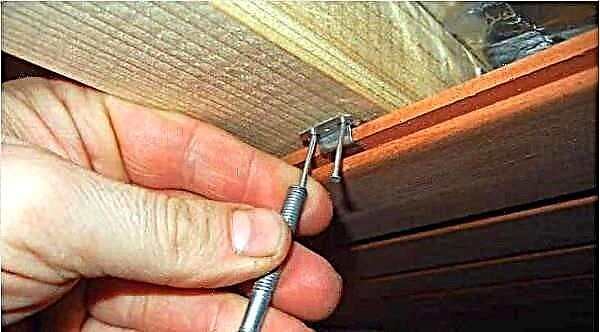
Fasten them with screws or nails to the battens. If you will use nails, take with a small hat - finish, self-tapping screws - on wood (better - light, not black). There is also a fastener option - brackets from a construction stapler. This is the fastest and most reliable way. Staples just take with a long sharpened leg, another T-shaped will do.
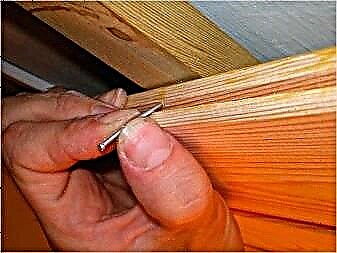
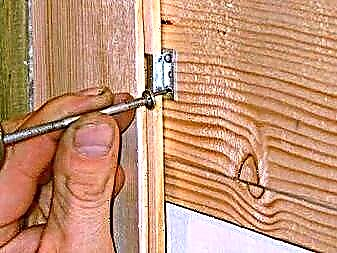
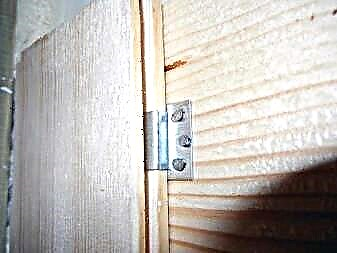
The first bar is installed in the most difficult corner for work. It is put into the corner with a spike, and the installation is checked with the building level. Nail into the layer (into the front surface), stepping back from the edge of 1-2 cm. To prevent the wood from breaking, a hole is made with a thin drill. Then they twist a screw or hammer a nail.
On the opposite side (there is a groove), the lining is fixed with nails, screws, brackets. They are driven at a 45 ° angle into the spike. It turns out a hidden mount - it closes with the next board.
Fastening the lining with a nail (self-tapping screw, bracket) in the groove
There is another option - lining with the use of special mounting plates - kleimers. They hold well if the spike is long enough, and this can most often be observed at the euro lining. Kleimers are installed in a spike (as if put on it). On the other hand, they have a mounting plate with holes for nails. One or two cloves with a small hat are driven into this plate.
Kleimer mount
The first board is attached to each plank of the crate, all subsequent ones - through one in a checkerboard pattern (alternating). The second board is inserted into the spike of the first. If it comes in loose, it is knocked out with a small piece of wood attached to the plank. and a hammer. Knock with a hammer on the attached piece of wood. Such complexity is necessary so as not to damage the board. Having driven the spike into the groove, they check whether the bar has become vertical. If necessary, correct, then beat. So the whole lining is assembled. The last bar sometimes needs to be cut in width. It is attached closer to the corner, like the first, in the face.
The installation process of the crate and the wooden lining is shown in the video.
The entire process of covering the balcony - from the installation of the exterior finish to the installation of slopes and platbands, see the video below. They only worked with PVC panels, but the finishing steps are similar. The only difference is that the wooden lining does not have starting strips. All tops and bottoms are covered with skirting boards, and corners with corners.
How to handle the lining
When lining the balcony with a lining, it is necessary to treat with antiseptics not only the finish, but also all the battens of the crate. The most popular protective impregnations and primers are listed below. Some of them can immediately give the wood a shade, not painting over, but emphasizing the texture.
- Senezh Aquadecor - tinting antiseptic. If you coat the wood with this composition, it immediately protects against mold, fungi, insects, while giving one of 16 shades. Does not need to use a topcoat.
- Aquatex “Soil antiseptic” - high-quality lining protection for subsequent topcoats (for example, for varnish).
- TIKKURILA VALTTI-POHJUSTE (TIKKURILA VALTI-POHJUSTE) primer wood preservative, protects against biodefeats, but does not protect against ultraviolet radiation. Therefore, prompt staining is recommended.
- Impregnation Manor "U-409". It creates a thin polymer film on wood through which steam penetrates, but this film prevents the penetration of dirt into the wood, preserving the appearance of the finish. The composition includes additives that protect against fungi, mold and insects.
On the packaging of each product there is an instruction manual and application. It describes application and flow rules for protection. Only following these rules can you be sure that the lining and the frame under it will last a long time.
If we talk about stains, then most of the modern compounds at the same time as the color of the wood has protective properties. For example, stain Aquatex (analogue Senezh Aquadecor). It has a wide color gamut, contains a hardly washed away antiseptic that protects wood from damage by fungi or insects.
Processing the lining on the balcony can be done in different ways. It is most convenient to use tinting antiseptics for decorating a balcony. A single treatment immediately protects and gives color. But they only give a shade, leaving the pores open. Dirt may accumulate in these pores. And washing it from there is no easy task. If you also need a protective film that will prevent the ingress of dirt, you can cover the lining (tinted or not) with varnish or dirt-repellent impregnation such as U-409 Estate. Impregnation creates a polymer film on the surface that covers the pores, but does not give shine.
Often there are problems on the sunny side: how to cover the lining on the balcony so that it does not fade. Light tinting, which slightly whitens the wood, is best suited. A light wall heats less and fading is not scary for her. This lining cladding looks great.
If you want to have a shiny surface, you can use any varnish for interior work. On the types and types of varnishes, watch the video. It will be easier for you to understand what varnish to cover the lining on the balcony.
Painting the lining on the balcony with ordinary paint is no longer relevant today. Why spend money on wood, and then paint over its texture ?. Then you can immediately put PVC.So choose: tinting, varnishing, or both.